
并发编程学习
发布于2021-06-07 20:37 阅读(1316) 评论(0) 点赞(14) 收藏(2)
目录
第一章 共享模型之线程
1.1、进程与线程
进程(Process)是系统进行资源分配和调度的基本单位,是操作系统结构的基础。在早期面向进程设计的计算机结构中,进程是程序的基本执行实体;在当代面向线程设计的计算机结构中,进程是线程的容器。
线程(Thread)是操作系统能够进行运算调度的最小单位。它被包含在进程之中,是进程中的实际运作单位。一个线程就是一个指令流,将指令流中的一条条指令以一定的顺序交给 CPU 执行。
在 windows 下查看进程的命令:
- 查看进程:
tasklist - 杀死进程:
taskkill /pid <PID>
在 linux 下查看进程的命令:
- 查看进程:
ps -fe - 查看线程:
top -H -p <PID> - 杀死进程:
kill <PID>
在 java 中查看进程的命令:
- 查看Java进程:
jps - 查看Java线程:
jstack <PID> - 图形化的工具:
jconsole
1.2、并行与并发
单核 CPU 下,线程实际还是 串行执行 的。操作系统中有一个组件叫做任务调度器,将 CPU 的时间片(windows下时间片最小约为 15 毫秒)分给不同的程序使用,只是由于 CPU 在线程间的切换非常快,人类感觉是同时运行的 。总结为一句话就是:微观串行,宏观并行,一般会将这种线程轮流使用 CPU 的做法称为并发(Concurrent)。
多核 CPU下,每个核都可以调度运行线程,这时候线程可以是并行(Parallel)的。
1.3、同步与异步
以调用方角度来讲:
- 需要等待结果返回后才能继续运行就是同步。
- 不需要等待结果返回就能继续运行就是异步。
1.4、线程创建方式
- 方式一:
Thread thread = new Thread(){
    @Override
    public void run() {
        System.out.println("thread run ...");
    }
};

thread.start();
简化后
Thread thread = new Thread(() -> System.out.println("thread run ..."));

thread.start();
- 方式二:
Thread thread = new Thread(new Runnable() {
    @Override
    public void run() {
        System.out.println("runnable run ...");
    }
});

thread.start();
简化后
Thread thread = new Thread(() -> System.out.println("runnable run ..."));

thread.start();
- 方式三:
Callable<Integer> callable = new Callable() {
    @Override
    public Object call() throws Exception {
        System.out.println("callable run ...");
        return 521;
    }
};
FutureTask futureTask = new FutureTask(callable);
Thread thread = new Thread(futureTask);
thread.start();
简化后
Thread thread = new Thread(new FutureTask(() -> {
    System.out.println("callable run ...");
    return 521;
}));

thread.start();
1.5、线程基本方法
ps:标黄色的方法代表是
static方法,可直接类名调用,无需创建对象。
| 方法名称 | 方法描述 | 注意事项 |
|---|---|---|
| start() | 启动一个新线程, 在新的线程运行 run 方法 | start 方法只是让线程进入就绪,里面代码不一定立刻 运行(CPU 的时间片还没分给它)。每个线程对象的 start方法只能调用一次,如果调用了多次会出现 IllegalThreadStateException |
| run() | 新线程启动后会调用的方法 | 如果在构造 Thread 对象时传递了 Runnable 参数,则 线程启动后会调用 Runnable 中的 run 方法,否则默 认不执行任何操作。但可以创建 Thread 的子类对象, 来覆盖默认行为 |
| join() | 等待线程运行结束 | |
| join(long n) | 等待线程运行结束, 最多等待 n 毫秒 | |
| getId() | 获取线程长整型的 id | id 唯一 |
| getName() | 获取线程名 | |
| setName(String name) | 修改线程名 | |
| getPriority() | 获取线程优先级 | |
| setPriority(int priority) | 修改线程优先级 | Java 中规定线程优先级是1~10 的整数,较大的优先级 能提高该线程被 CPU 调度的机率 |
| getState() | 获取线程状态 | Java 中线程状态是用 6 个 enum 表示,分别为: NEW, RUNNABLE, BLOCKED, WAITING, TIMED_WAITING, TERMINATED |
| interrupt() | 打断线程 | 如果被打断线程正在 sleep,wait,join 会导致被 打断的线程抛出 InterruptedException,并清除 打断标记;如果打断正在运行的线程,则会设置 打断标记;park 的线程被打断,也会设置打断标记 |
| interrupted() | 判断当前线程是否被打断 | 会清除打断标记 |
| isInterrupted() | 判断当前线程是否被打断 | 不会清除打断标记 |
| isAlive() | 判断当前线程是否存活 | |
| isDaemon() | 判断当前线程是否是守护线程 | |
| setDaemon(boolean on) | 设置当前线程为守护线程 | |
| currentThread() | 获取当前正在执行的线程 | |
| sleep(long n) | 让当前执行的线程休眠n毫秒, 休眠时让出 CPU 的时间片 给其它线程 | |
| yield() | 提示线程调度器让出当前线程 对 CPU 的使用 | 主要是为了测试和调试,它的具体的实现依赖于 操作系统的任务调度器 |
1.6、线程安全问题
两个线程对初始值为 0 的静态变量一个做自增,一个做自减,各做 5000 次,结果是 0 吗?
static int counter = 0;

public static void main(String[] args) throws InterruptedException {
    Thread t1 = new Thread(() -> {
        for (int i = 0; i < 5000; i++) {
            counter++;
        }
    }, "t1");
    Thread t2 = new Thread(() -> {
        for (int i = 0; i < 5000; i++) {
            counter--;
        }
    }, "t2");
    t1.start();
    t2.start();
    t1.join();
    t2.join();
    log.debug("{}", counter);
}
以上的结果可能是正数、负数、零。因为 Java 中对静态变量的自增,自减并不是原子操作,要彻底理解,必须从字节码来进行分析。
对于 i++ 而言(i 为静态变量),实际会产生如下的 JVM 字节码指令:
getstatic i // 获取静态变量i的值
iconst_1 	// 准备常量1
iadd 		// 自增
putstatic i // 将修改后的值存入静态变量i
对于 i-- 而言(i 为静态变量),实际会产生如下的 JVM 字节码指令:
getstatic i // 获取静态变量i的值
iconst_1 	// 准备常量1
isub 		// 自减
putstatic i // 将修改后的值存入静态变量i
而 Java 的内存模型如下,完成静态变量的自增,自减需要在主存和工作内存中进行数据交换:
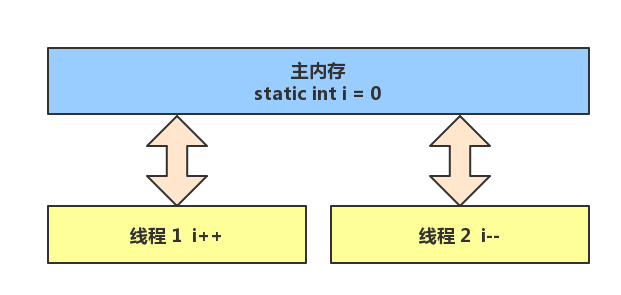
如果是单线程以上 8 行代码是顺序执行(不会交错)没有问题:
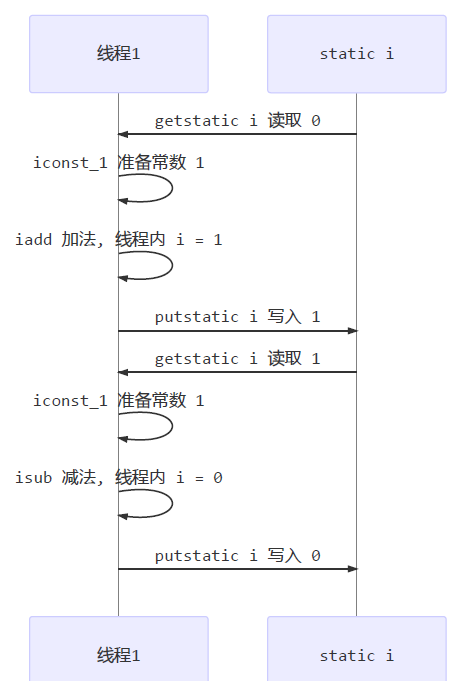
但多线程下这 8 行代码可能交错运行:
出现负数的情况:
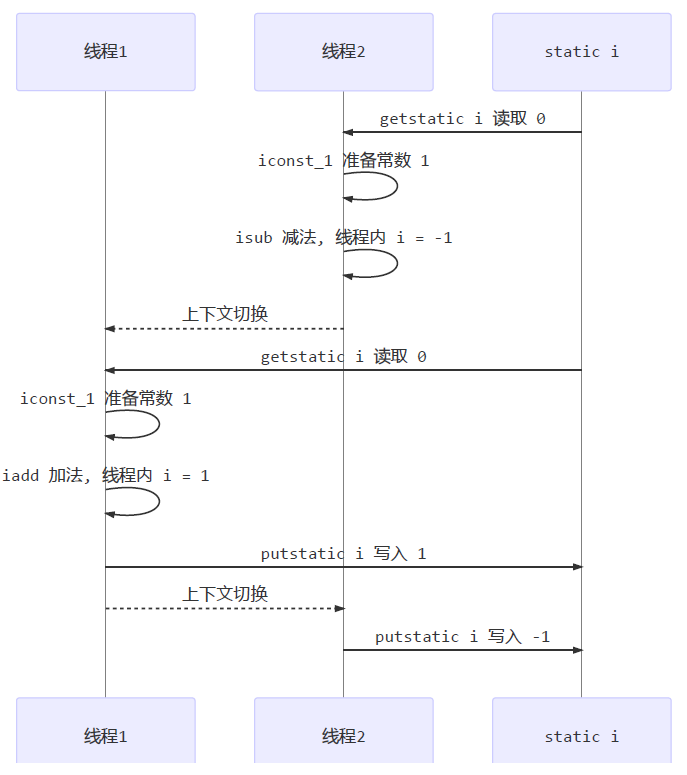
出现正数的情况:
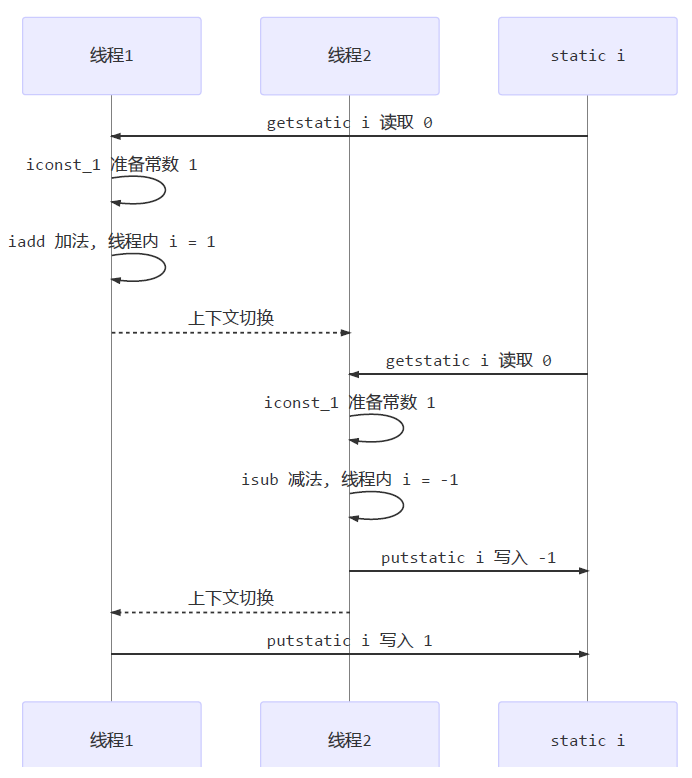
一个程序运行多个线程本身是没有问题的,问题出现在多个线程访问共享资源:
- 多个线程读共享资源其实也没有问题
- 在多个线程对共享资源读写操作时发生指令交错,就会出现问题
一段代码块内如果存在对共享资源的多线程读写操作,称这段代码块为临界区(Critical Section)
例如,下面代码中的临界区:
static int counter = 0;

static void increment()
// 临界区
{
	counter++;
}

static void decrement()
// 临界区
{
	counter--;
}
多个线程在临界区内执行,由于代码的执行序列不同而导致结果无法预测,称之为发生了竞态条件(Race Condition)
为了避免临界区的竞态条件发生,有多种手段可以达到目的。
- 阻塞式的解决方案:synchronized,Lock
- 非阻塞式的解决方案:原子变量
我们使用阻塞式的解决方案:synchronized,来解决上述问题,即俗称的【对象锁】,它采用互斥的方式让同一时刻至多只有一个线程能持有【对象锁】,其它线程再想获取这个【对象锁】时就会阻塞住。这样就能保证拥有锁的线程可以安全的执行临界区内的代码,不用担心线程上下文切换,以此避免线程安全问题。
虽然 Java 中互斥和同步都可以采用 synchronized 关键字来完成,但它们还是有区别的:
- 互斥是保证临界区的竞态条件发生,同一时刻只能有一个线程执行临界区代码
- 同步是由于线程执行的先后、顺序不同、需要一个线程等待其它线程运行到某个点
synchronized的语法:
synchronized(对象)
{
	临界区
}
synchronized改进后:
static int counter = 0;
static final Object room = new Object();

public static void main(String[] args) throws InterruptedException {
    Thread t1 = new Thread(() -> {
        for (int i = 0; i < 5000; i++) {
            synchronized (room) {
                counter++;
            }
        }
    }, "t1");
    Thread t2 = new Thread(() -> {
        for (int i = 0; i < 5000; i++) {
            synchronized (room) {
                counter--;
            }
        }
    }, "t2");
    t1.start();
    t2.start();
    t1.join();
    t2.join();
    log.debug("{}", counter);
}

synchronized 实际是用对象锁保证了临界区内代码的原子性,临界区内的代码对外是不可分割的,不会被线程切换所打断。
方法上的 synchronized
class Test{
    public synchronized void test() {
    }
}
等价于
class Test{
    public void test() {
        synchronized(this) {
        }
    }
}
class Test{
    public synchronized static void test() {
    }
}
等价于
class Test{
    public static void test() {
        synchronized(Test.class) {
        }
    }
}
成员变量和静态变量是否线程安全?
- 如果它们没有共享,则线程安全
- 如果它们被共享了,根据它们的状态是否能够改变,又分两种情况
- 如果只有读操作,则线程安全
- 如果有读写操作,则这段代码是临界区,需要考虑线程安全
局部变量是否线程安全?
- 局部变量是线程安全的
- 但局部变量引用的对象则未必
- 如果该对象没有逃离方法的作用访问,它是线程安全的
- 如果该对象逃离方法的作用范围,需要考虑线程安全
1.7、线程八锁问题
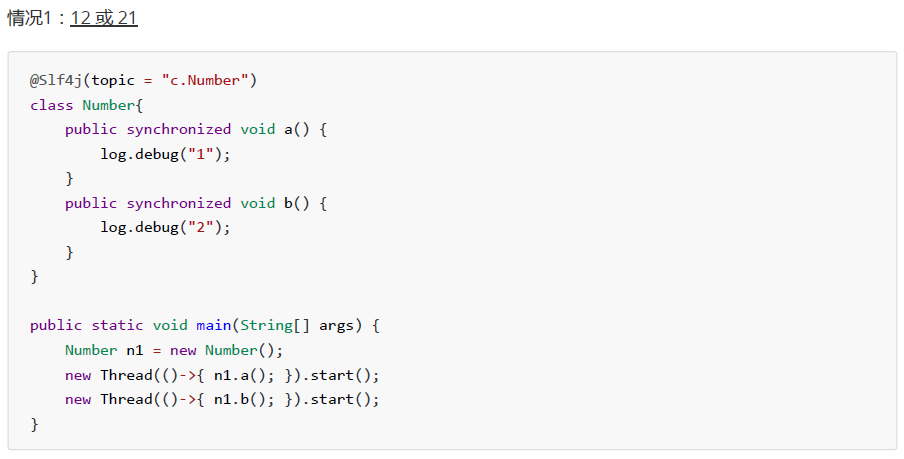
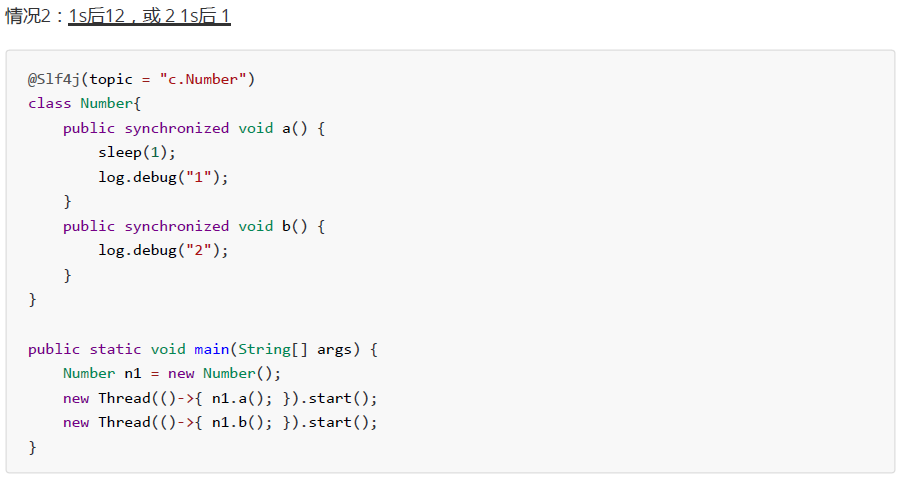
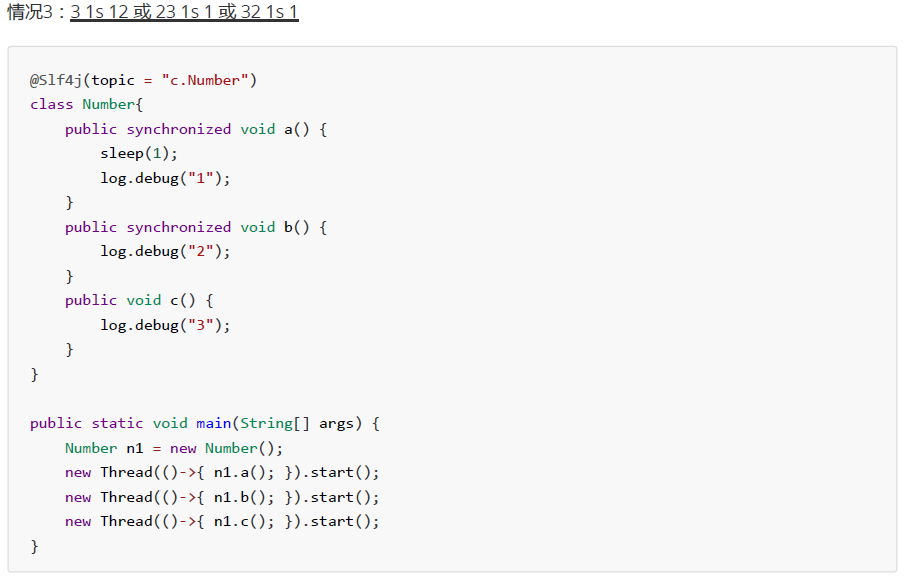

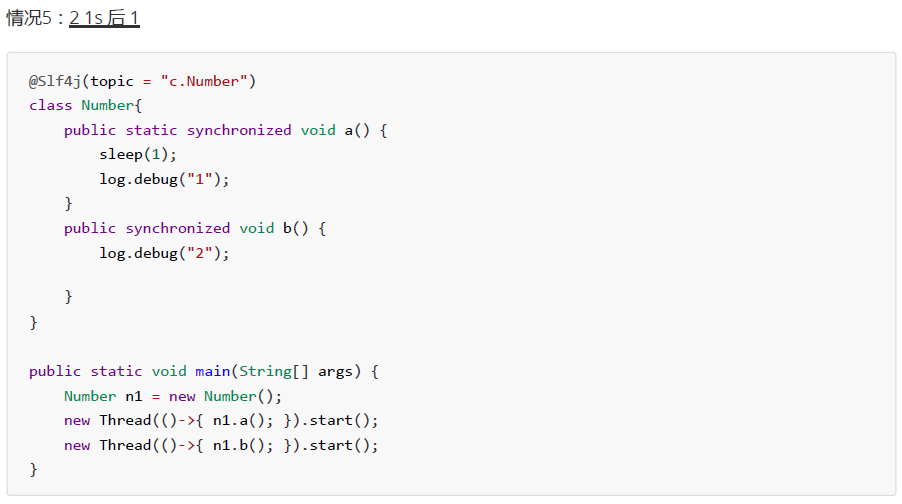
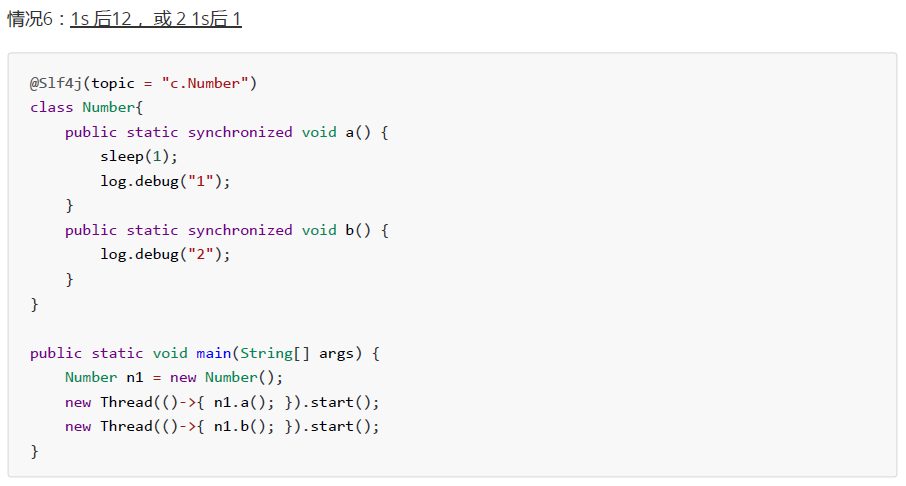
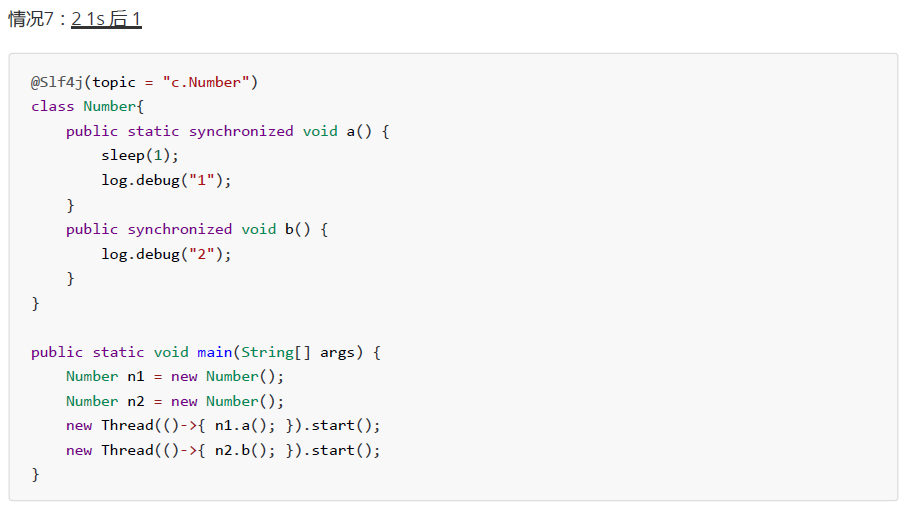

第二章 共享模型之管程
2.1、monitor原理
在学习Monitor之前,我们需要了解 Java 对象头,Java 对象头的组成,这里以32位虚拟机为例:
普通对象:

数组对象:

其中 32位虚拟机的 Mark Word 结构为:

其中 64位虚拟机的 Mark Word 结构为:
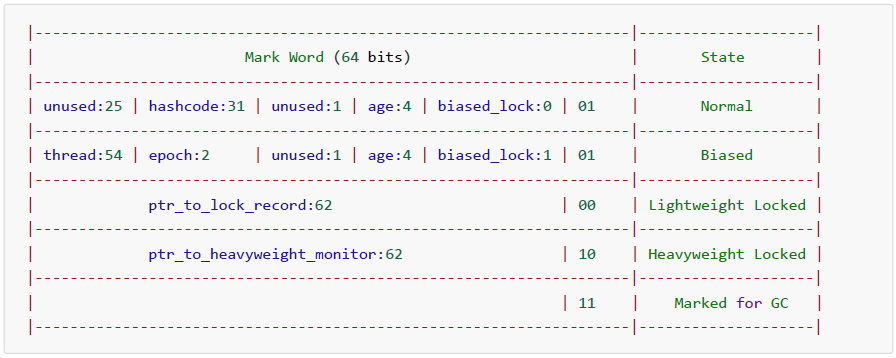
Monitor 被翻译为监视器或管程,每个 Java 对象都可以关联一个 Monitor 对象,如果使用 synchronized 给对象上锁( 重量级 )之后,该对象头的 Mark Word 中就被设置指向 Monitor 对象的指针。Monitor 结构如下:
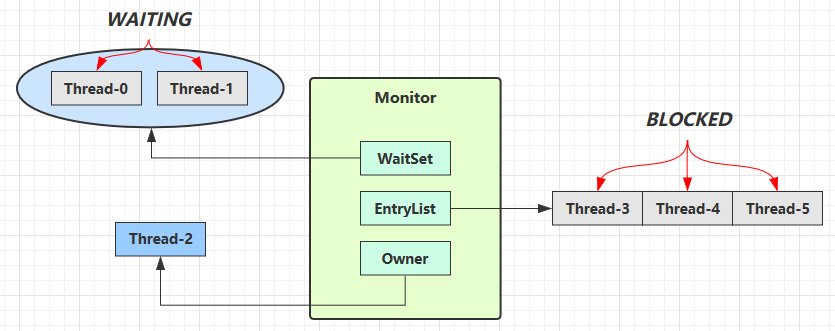
刚开始 Monitor 中 Owner 为 null,当 Thread-2 执行 synchronized(obj) 就会将 Monitor 的所有者 Owner 置为 Thread-2,Monitor中只能有一个 Owner,在 Thread-2 上锁的过程中,如果 Thread-3,Thread-4,Thread-5 也来执行 synchronized(obj),就进入EntryList 中阻塞住,Thread-2 执行完同步代码块的内容,然后唤醒 EntryList 中等待的线程来竞争锁,竞争的时候是非公平的,图中 WaitSet 中的 Thread-0,Thread-1 是之前获得过锁,但条件不满足则进入 WAITING 等待状态,后面讲 wait-notify 时会分析。
注意:synchronized 必须是进入同一个对象的 Monitor 才有上述效果,不加 synchronized 的对象不会关联监视器,不遵从以上规则。
2.2、synchronized原理
给出一个同步代码块:

则相对应的字节码为:
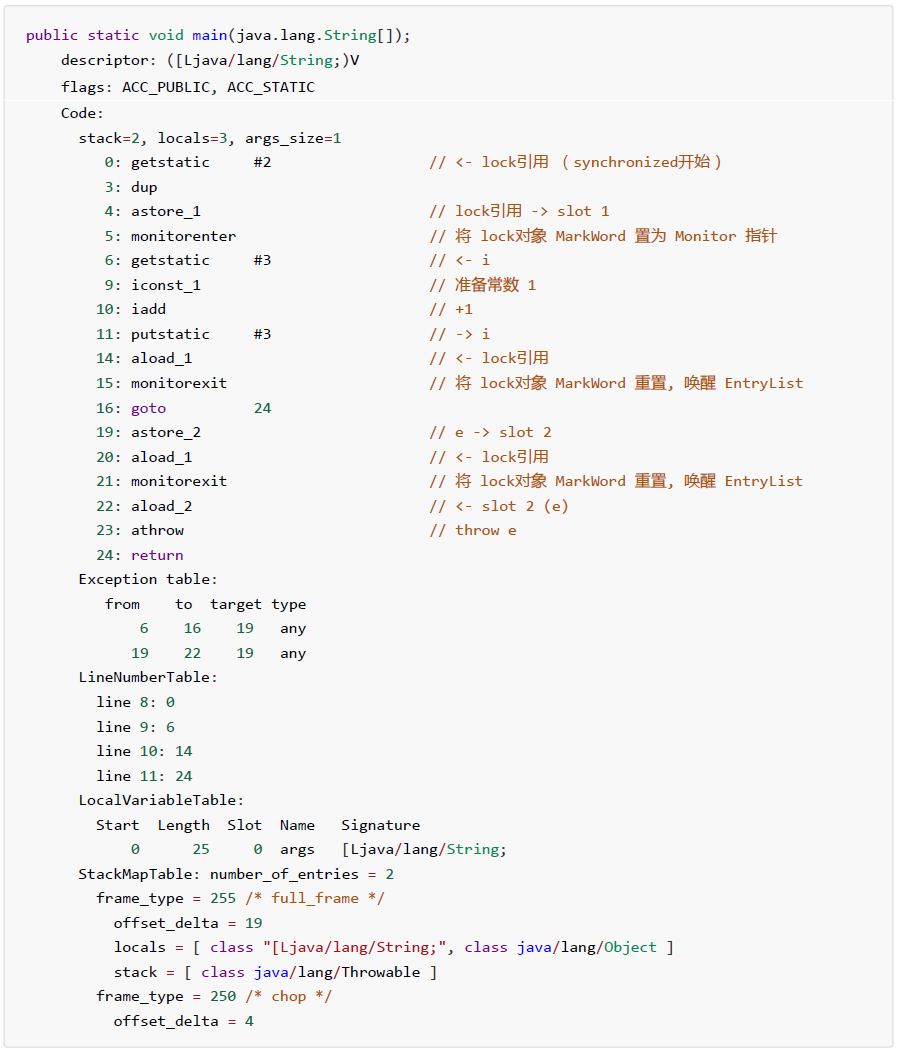
注意:方法级别的 synchronized 不会在字节码指令中有所体现。
2.2.1、轻量级锁
轻量级锁的使用场景:如果一个对象虽然有多线程要加锁,但加锁的时间是错开的(也就是没有竞争),那么可以使用轻量级锁来优化。
轻量级锁对使用者是透明的,即语法仍然是 synchronized,Monitor 对应的就是重量级锁,注意锁的状态和 Mark Word 后两位有关。
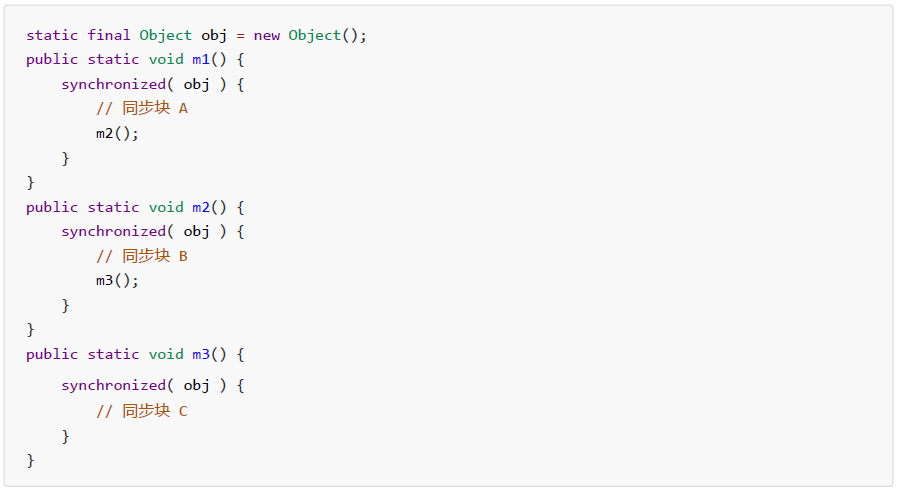
假设有两个方法同步块,利用同一个对象加锁,我们给出示例代码:
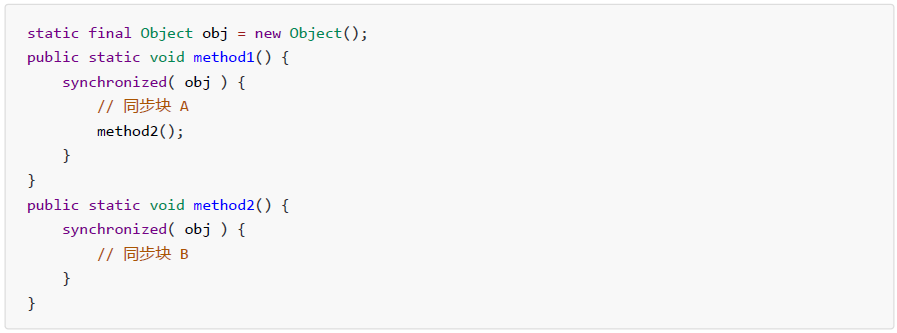
轻量级锁的流程如下所示:
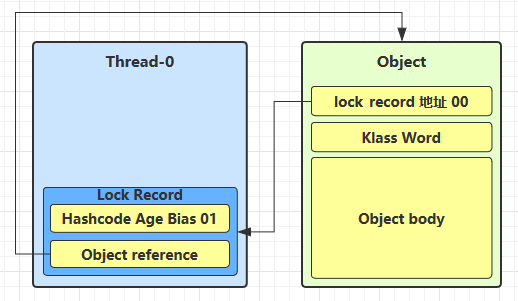
- 创建锁记录(Lock Record)对象,每个线程的栈帧都会包含一个锁记录的结构,内部可以存储锁定对象的Mark Word。
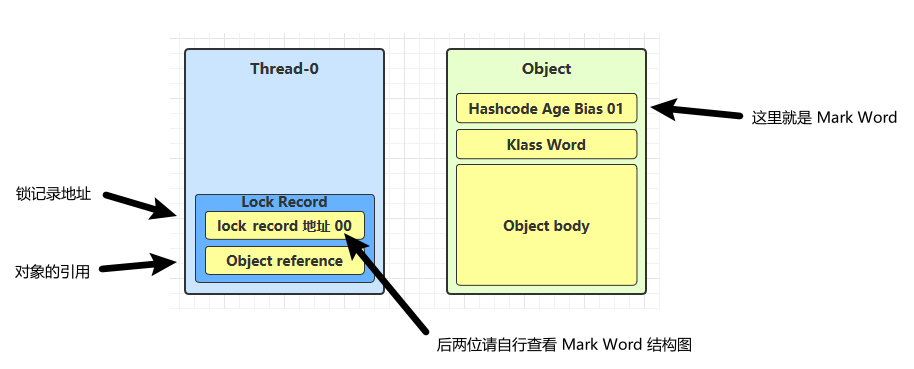
- 让锁记录中 Object reference 指向锁对象,并尝试用 CAS 替换 Object 的 Mark Word,将 Mark Word 的值存入锁记录。
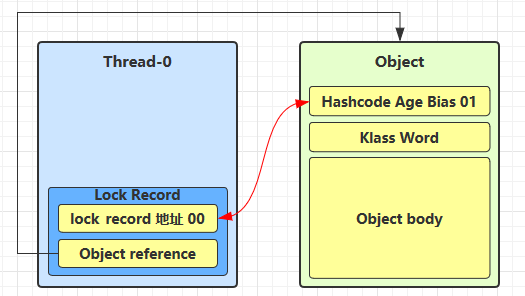
- 如果 CAS 替换成功,对象头中存储了锁记录地址和状态 00 ,表示由该线程给对象加锁,这时图示如下:
- 如果 CAS 失败,有两种情况:
- 如果是其它线程已经持有了该 Object 的轻量级锁,这时表明有竞争,进入锁膨胀过程,锁膨胀后边介绍
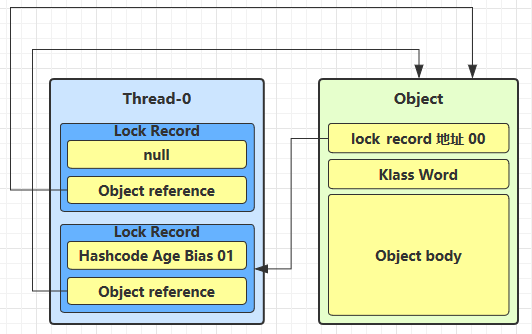
- 如果是自己执行了 synchronized 锁重入,那么再添加一条 Lock Record 作为重入的计数
- 当退出 synchronized 代码块(解锁时)如果有取值为 null 的锁记录,表示有重入,这时重置锁记录,表示重入计数减一。
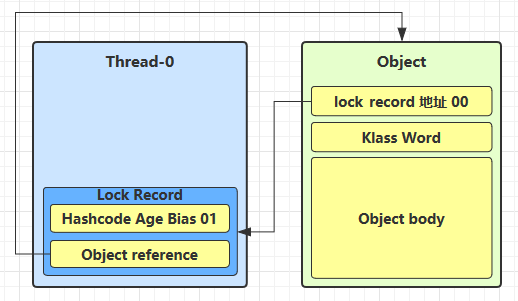
- 当退出 synchronized 代码块(解锁时)锁记录的值不为 null,这时使用 cas 将 Mark Word 的值恢复给对象头,也分两种情况:
- 成功,则解锁成功
- 失败,说明轻量级锁进行了锁膨胀或已经升级为重量级锁,进入重量级锁解锁流程
2.2.2、锁膨胀
如果在尝试加轻量级锁的过程中,CAS 操作无法成功,这时一种情况就是有其它线程为此对象加上了轻量级锁(有竞争),这时需要进行锁膨胀,将轻量级锁变为重量级锁。
锁膨胀的流程如下所示:
- 当 Thread-1 进行轻量级加锁时,Thread-0 已经对该对象加了轻量级锁。
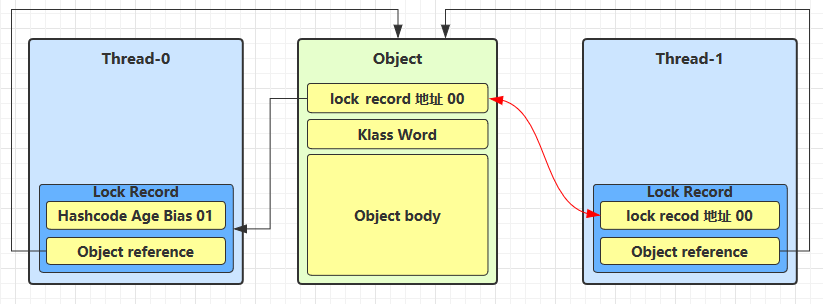
- 这时 Thread-1 加轻量级锁失败,进入锁膨胀流程,即为 Object 对象申请 Monitor 锁(重量级锁),让 Object 指向重量级锁地址,然后自己(Thread-1)进入 Monitor 的 EntryList 阻塞住。
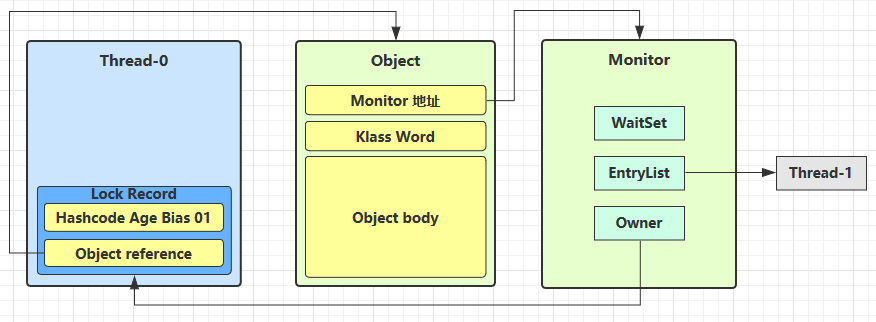
- 当 Thread-0 退出同步块解锁时,使用 CAS 将 Mark Word 的值恢复给对象头,肯定失败。这时会进入重量级解锁流程,即按照 Monitor 地址找到 Monitor 对象,设置 Owner 为 null,唤醒 EntryList 中被阻塞住的线程。
2.2.3、自旋优化
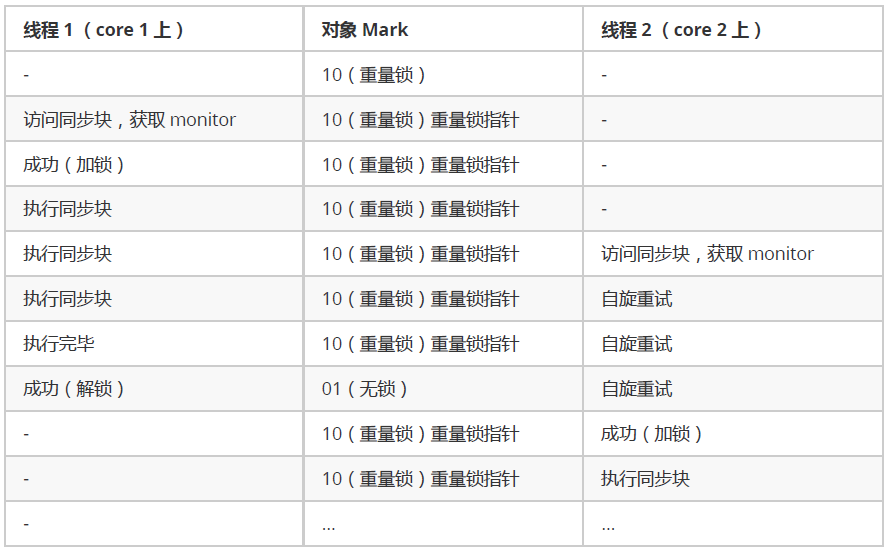
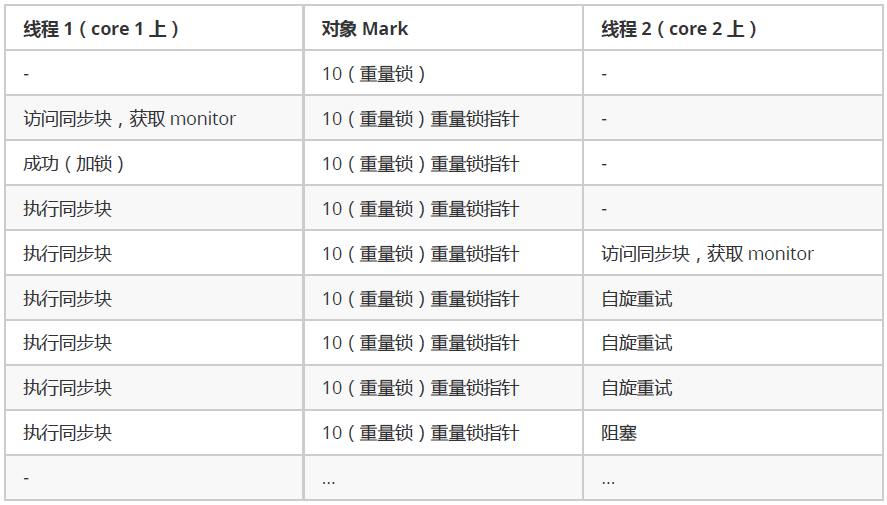
重量级锁竞争的时候,还可以使用自旋来进行优化,如果当前线程自旋成功(即这时候持锁线程已经退出了同步块,释放了锁),这时当前线程就可以避免阻塞。自旋会占用 CPU 时间,单核 CPU 自旋就是浪费,多核 CPU 自旋才能发挥优势。在 Java 6 之后自旋锁是自适应的,比如对象刚刚的一次自旋操作成功过,那么认为这次自旋成功的可能性会高,就多自旋几次;反之,就少自旋甚至不自旋,总之,比较智能。Java 7 之后不能控制是否开启自旋功能。
自旋重试成功的情况:
自旋重试失败的情况:
2.2.4、偏向锁
轻量级锁在没有竞争时(就只有自己这个线程),每次重入仍然需要执行 CAS 操作。Java 6 中引入了偏向锁来做进一步优化:只有第一次使用 CAS 将线程 ID 设置到对象的 Mark Word 头,之后发现这个线程 ID 是自己的就表示没有竞争,不用重新 CAS。以后只要不发生竞争,这个对象就归该线程所有。
下面我们给出一种偏向锁示例代码:
下面给出轻量级锁和偏向锁的对比图:

我当前的电脑系统是 64 位,所以安装的 64 位虚拟机,回忆一下 64 对象头的位Mark Word 结构为:
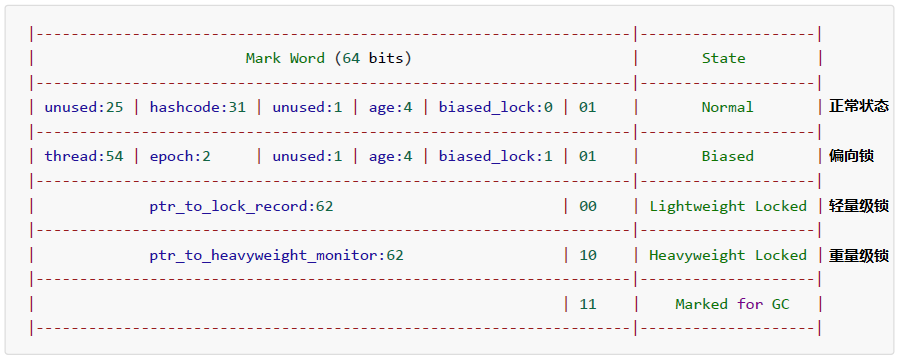
一个对象创建时,如果开启了偏向锁(默认开启),那么对象创建后,Mark Word 值为 0x05 即最后 3 位为 101,这时它的thread、epoch、age 都为 0。处于偏向锁的对象解锁后,线程 id 仍存储于对象头中。偏向锁默认是延迟的,不会在程序启动时立即生效,如果想避免延迟,我们可以添加 VM 参数 -XX:BiasedLockingStartupDelay=0 来禁用延迟。如果想要禁用掉偏向锁,我们可以添加 VM 参数 -XX:-UseBiasedLocking 来禁用偏向锁。如果没有开启偏向锁,那么对象创建后,Mark Word 值为 0x01 即最后 3 位为 001,这时它的 hashcode、age 都为 0,并且只有第一次用到 hashcode 时才会赋值。
切记注意,如果一旦调用了对象的 hashCode,会导致偏向锁被撤销,这是因为偏向锁的对象 Mark Word 中存储的是线程 id,根本没有地方再存储 hashCode 的值了,而轻量级锁会在锁记录中记录 hashCode,重量级锁会在 Monitor 中记录 hashCode。
还有就是,当有其它线程使用偏向锁对象时,会将偏向锁升级为轻量级锁,如果竞争继续激烈,轻量级锁会继续膨胀升级到重量级锁。
再有就是,当调用对象的 wait/notify 方法时,会将偏向锁升级为重量级锁。
批量重偏向
如果对象虽然被多个线程访问,但没有竞争,这时偏向了线程 T1 的对象仍有机会重新偏向 T2,重偏向会重置对象的线程 id ,当撤销偏向锁阈值超过 20 次后,jvm 会这样觉得,我是不是偏向错了呢,于是会在给这些对象加锁时重新偏向至 T2 线程。
批量撤销
当撤销偏向锁阈值超过 40 次后,jvm 会这样觉得,自己确实偏向错了,根本就不该偏向。于是整个类的所有对象都会变为不可偏向的,新建的对象也是不可偏向的。那加锁则直接为轻量级锁,撤销了偏向锁这个步骤。
2.2.5、锁消除
比如有如下场景,我先执行方法a,然后执行方法b,这是同步操作,虽然方法b添加了锁,但是并没有起到什么实质性作用,JIT编译会对这样的代码进行去锁优化,因为这样的锁并没有什么作用,如果想要取消这一优化机制,只需要添加参数-XX:-EliminateLocks即可。

测试一:java -jar benchmarks.jar

测试二:java -XX:-EliminateLocks -jar benchmarks.jar

2.3、wait & notify原理
- obj.wait() 让进入 object 监视器的线程到 waitSet 等待
- obj.notify() 在 object 上正在 waitSet 等待的线程中挑一个唤醒
- obj.notifyAll() 让 object 上正在 waitSet 等待的线程全部唤醒
它们都是线程之间进行协作的手段,都属于 Object 对象的方法,必须获得此对象的重量级锁,才能调用这几个方法。
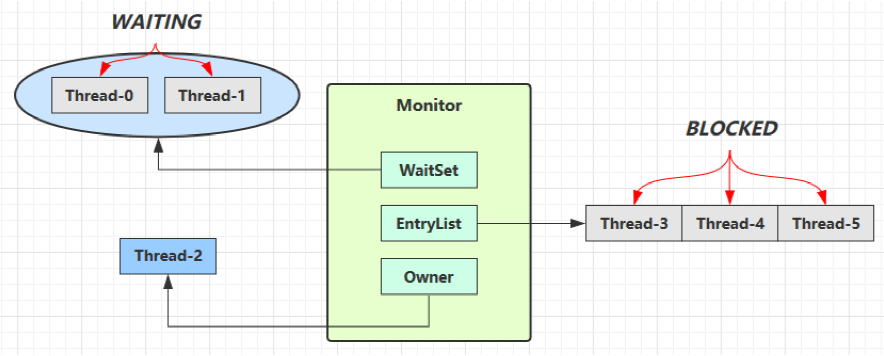
- Owner 线程发现条件不满足,调用 wait 方法,即可进入 WaitSet 变为 WAITING 状态
- BLOCKED 和 WAITING 的线程都处于阻塞状态,不占用 CPU 时间片
- BLOCKED 线程会在 Owner 线程释放锁时唤醒
- WAITING 线程会在 Owner 线程调用 notify 或 notifyAll 时唤醒,但唤醒后并不意味者立刻获得锁,仍需进入EntryList 重新竞争
2.3.1、同步模式之保护性暂停
保护性暂停即 Guarded Suspension,用在一个线程等待另一个线程的执行结果,因为要等待另一方的结果,因此归类到同步模式。
有一个结果需要从一个线程传递到另一个线程,让他们关联同一个 GuardedObject,如果有结果不断从一个线程到另一个线程,那么可以使用消息队列(详情见生产者/消费者)。
JDK 中,join 的实现、Future 的实现,采用的就是此模式,接下来我们会逐层递进,来进行学习。
单任务版本
@Slf4j
class GuardedObject {
    private Object response;
    private final Object lock = new Object();

    public Object get() {
        synchronized (lock) {
            // 条件不满足则等待
            while (response == null) {
                try {
                    lock.wait();
                } catch (InterruptedException e) {
                    e.printStackTrace();
                }
            }
            return response;
        }
    }

    public void complete(Object response) {
        synchronized (lock) {
            // 条件满足,通知等待线程
            this.response = response;
            log.debug("notify...");
            lock.notifyAll();
        }
    }
}

@Slf4j
public class Test10 {
    public static void main(String[] args) {
        GuardedObject guardedObject = new GuardedObject();
        // 开启线程执行任务
        log.debug("starting...");
        new Thread(() -> {
            try {
                Thread.sleep(5000);
                guardedObject.complete("done.");
            } catch (InterruptedException e) {
                e.printStackTrace();
            }
        }).start();
        log.debug("waiting...");
        // 主线程阻塞等待
        log.debug("get response: {}", guardedObject.get());
    }
}
15:49:26.949 [main] DEBUG com.caochenlei.Test10 - starting...
15:49:27.074 [main] DEBUG com.caochenlei.Test10 - waiting...
15:49:32.082 [Thread-0] DEBUG com.caochenlei.GuardedObject - notify...
15:49:32.082 [main] DEBUG com.caochenlei.Test10 - get response: done.
带超时版本
@Slf4j
class GuardedObject {
    private Object response;
    private final Object lock = new Object();

    public Object get(long millis) {
        synchronized (lock) {
            // 1) 记录最初时间
            long begin = System.currentTimeMillis();
            // 2) 已经经历的时间
            long timePassed = 0;
            while (response == null) {
                // 4) 假设 millis 是 1000,结果在 400 时唤醒了,那么还有 600 要等
                long waitTime = millis - timePassed;
                log.debug("waitTime: {}", waitTime);
                if (waitTime <= 0) {
                    log.debug("break...");
                    break;
                }
                try {
                    lock.wait(waitTime);
                } catch (InterruptedException e) {
                    e.printStackTrace();
                }
                // 3) 如果提前被唤醒,这时已经经历的时间假设为 400
                timePassed = System.currentTimeMillis() - begin;
                log.debug("timePassed: {}, object is null {}", timePassed, response == null);
            }
            return response;
        }
    }

    public void complete(Object response) {
        synchronized (lock) {
            // 条件满足,通知等待线程
            this.response = response;
            log.debug("notify...");
            lock.notifyAll();
        }
    }
}

@Slf4j
public class Test10 {
    public static void main(String[] args) {
        GuardedObject guardedObject = new GuardedObject();
        // 开启线程执行任务
        log.debug("starting...");
        new Thread(() -> {
            try {
                Thread.sleep(5000);
                guardedObject.complete("done.");
            } catch (InterruptedException e) {
                e.printStackTrace();
            }
        }).start();
        log.debug("waiting...");
        // 主线程阻塞等待
        log.debug("get response: {}", guardedObject.get(2000));
    }
}
15:47:17.210 [main] DEBUG com.caochenlei.Test10 - starting...
15:47:17.319 [main] DEBUG com.caochenlei.Test10 - waiting...
15:47:17.319 [main] DEBUG com.caochenlei.GuardedObject - waitTime: 2000
15:47:19.341 [main] DEBUG com.caochenlei.GuardedObject - timePassed: 2022, object is null true
15:47:19.344 [main] DEBUG com.caochenlei.GuardedObject - waitTime: -22
15:47:19.344 [main] DEBUG com.caochenlei.GuardedObject - break...
15:47:19.344 [main] DEBUG com.caochenlei.Test10 - get response: null
15:47:22.324 [Thread-0] DEBUG com.caochenlei.GuardedObject - notify...
多任务版本
class GuardedObject {
    private Object response;
    private final Object lock = new Object();

    // 标识 Guarded Object
    private int id;

    public GuardedObject(int id) {
        this.id = id;
    }

    public int getId() {
        return id;
    }

    public Object get(long millis) {
        synchronized (lock) {
            // 1) 记录最初时间
            long begin = System.currentTimeMillis();
            // 2) 已经经历的时间
            long timePassed = 0;
            while (response == null) {
                // 4) 假设 millis 是 1000,结果在 400 时唤醒了,那么还有 600 要等
                long waitTime = millis - timePassed;
                if (waitTime <= 0) {
                    break;
                }
                try {
                    lock.wait(waitTime);
                } catch (InterruptedException e) {
                    e.printStackTrace();
                }
                // 3) 如果提前被唤醒,这时已经经历的时间假设为 400
                timePassed = System.currentTimeMillis() - begin;
            }
            return response;
        }
    }

    public void complete(Object response) {
        synchronized (lock) {
            // 条件满足,通知等待线程
            this.response = response;
            lock.notifyAll();
        }
    }
}

class GuardedObjects {
    private static Map<Integer, GuardedObject> guardedObjects = new Hashtable<>();
    private static int id = 1;

    private static synchronized int generateId() {
        return id++;
    }

    public static GuardedObject getGuardedObject(int id) {
        return guardedObjects.remove(id);
    }

    public static GuardedObject createGuardedObject() {
        GuardedObject go = new GuardedObject(generateId());
        guardedObjects.put(go.getId(), go);
        return go;
    }

    public static Set<Integer> getIds() {
        return guardedObjects.keySet();
    }
}
跟业务相关的代码:
@Slf4j//收件人
class People extends Thread {
    @Override
    public void run() {
        GuardedObject guardedObject = GuardedObjects.createGuardedObject();
        log.debug("开始收信 id:{}", guardedObject.getId());
        Object mail = guardedObject.get(5000);
        log.debug("收到信件 id:{}, 内容:{}", guardedObject.getId(), mail);
    }
}

@Slf4j//邮递员
class Postman extends Thread {
    private int id;
    private String mail;

    public Postman(int id, String mail) {
        this.id = id;
        this.mail = mail;
    }

    @Override
    public void run() {
        GuardedObject guardedObject = GuardedObjects.getGuardedObject(id);
        log.debug("送信 id:{}, 内容:{}", id, mail);
        guardedObject.complete(mail);
    }
}
跟测试相关的代码:
@Slf4j
public class Test10 {
    public static void main(String[] args) throws InterruptedException {
        for (int i = 0; i < 3; i++) {
            new People().start();
        }
        Thread.sleep(1000);
        for (Integer id : GuardedObjects.getIds()) {
            new Postman(id, "内容" + id).start();
        }
    }
}
16:12:56.457 [Thread-1] DEBUG com.caochenlei.People - 开始收信 id:3
16:12:56.457 [Thread-2] DEBUG com.caochenlei.People - 开始收信 id:2
16:12:56.457 [Thread-0] DEBUG com.caochenlei.People - 开始收信 id:1
16:12:57.447 [Thread-3] DEBUG com.caochenlei.Postman - 送信 id:3, 内容:内容3
16:12:57.447 [Thread-1] DEBUG com.caochenlei.People - 收到信件 id:3, 内容:内容3
16:12:57.447 [Thread-5] DEBUG com.caochenlei.Postman - 送信 id:1, 内容:内容1
16:12:57.447 [Thread-0] DEBUG com.caochenlei.People - 收到信件 id:1, 内容:内容1
16:12:57.447 [Thread-4] DEBUG com.caochenlei.Postman - 送信 id:2, 内容:内容2
16:12:57.447 [Thread-2] DEBUG com.caochenlei.People - 收到信件 id:2, 内容:内容2
2.3.2、异步模式之生产者/消费者
与前面的保护性暂停中的 GuardObject 不同,不需要产生结果和消费结果的线程一一对应。消费队列可以用来平衡生产和消费的线程资源,生产者仅负责产生结果数据,不关心数据该如何处理,而消费者专心处理结果数据,消息队列是有容量限制的,满时不会再加入数据,空时不会再消耗数据。JDK 中各种阻塞队列,采用的就是这种模式。

class Message {
    private int id;
    private Object message;

    public Message(int id, Object message) {
        this.id = id;
        this.message = message;
    }

    public int getId() {
        return id;
    }

    public Object getMessage() {
        return message;
    }
}

@Slf4j
class MessageQueue {
    private LinkedList<Message> queue;
    private int capacity;

    public MessageQueue(int capacity) {
        this.capacity = capacity;
        queue = new LinkedList<>();
    }

    public Message take() {
        synchronized (queue) {
            while (queue.isEmpty()) {
                log.debug("库存没货了,wait");
                try {
                    queue.wait();
                } catch (InterruptedException e) {
                    e.printStackTrace();
                }
            }
            Message message = queue.removeFirst();
            queue.notifyAll();
            return message;
        }
    }

    public void put(Message message) {
        synchronized (queue) {
            while (queue.size() == capacity) {
                log.debug("库存已上限,wait");
                try {
                    queue.wait();
                } catch (InterruptedException e) {
                    e.printStackTrace();
                }
            }
            queue.addLast(message);
            queue.notifyAll();
        }
    }
}

@Slf4j
public class Test11 {
    public static void main(String[] args) {
        MessageQueue messageQueue = new MessageQueue(2);
        // 4 个生产者线程, 负责生产
        for (int i = 0; i < 4; i++) {
            int id = i;
            new Thread(() -> {
                log.debug("try put message({})", id);
                messageQueue.put(new Message(id, "msg" + id));
            }, "生产者" + id).start();
        }
        // 2 个消费者线程, 负责消费
        for (int i = 0; i < 2; i++) {
            int id = i;
            new Thread(() -> {
                while (true) {
                    Message message = messageQueue.take();
                    log.debug("take message({}): {}", message.getId(), message.getMessage());
                }
            }, "消费者" + id).start();
        }
    }
}
09:06:03.284 [消费者0] DEBUG com.caochenlei.MessageQueue - 库存没货了,wait
09:06:03.268 [生产者0] DEBUG com.caochenlei.Test11 - try put message(0)
09:06:03.284 [生产者3] DEBUG com.caochenlei.Test11 - try put message(3)
09:06:03.268 [生产者2] DEBUG com.caochenlei.Test11 - try put message(2)
09:06:03.284 [消费者0] DEBUG com.caochenlei.Test11 - take message(0): msg0
09:06:03.284 [消费者0] DEBUG com.caochenlei.Test11 - take message(3): msg3
09:06:03.284 [消费者0] DEBUG com.caochenlei.Test11 - take message(2): msg2
09:06:03.284 [消费者0] DEBUG com.caochenlei.MessageQueue - 库存没货了,wait
09:06:03.268 [生产者1] DEBUG com.caochenlei.Test11 - try put message(1)
09:06:03.284 [消费者0] DEBUG com.caochenlei.Test11 - take message(1): msg1
09:06:03.284 [消费者0] DEBUG com.caochenlei.MessageQueue - 库存没货了,wait
2.3.3、同步模式之固定顺序
比如,必须先 2 后 1 打印输出。
public class Test12 {
    // 用来同步的对象
    static Object obj = new Object();
    // t2 运行标记, 代表 t2 是否执行过
    static boolean t2runed = false;

    public static void main(String[] args) {
        Thread t1 = new Thread(() -> {
            synchronized (obj) {
                // 如果 t2 没有执行过,t1 先等一会
                while (!t2runed) {
                    try {
                        obj.wait();
                    } catch (InterruptedException e) {
                        e.printStackTrace();
                    }
                }
            }
            System.out.println(1);
        });

        Thread t2 = new Thread(() -> {
            System.out.println(2);
            synchronized (obj) {
                // 修改运行标记
                t2runed = true;
                // 通知 obj 上等待的线程
                obj.notifyAll();
            }
        });

        t1.start();
        t2.start();
    }
}
2
1
2.3.4、同步模式之交替输出
线程 1 输出 a 5 次,线程 2 输出 b 5 次,线程 3 输出 c 5 次。现在要求输出 abcabcabcabcabc 怎么实现?
class SyncWaitNotify {
    private int flag;
    private int loopNumber;

    public SyncWaitNotify(int flag, int loopNumber) {
        this.flag = flag;
        this.loopNumber = loopNumber;
    }

    public void print(int waitFlag, int nextFlag, String str) {
        for (int i = 0; i < loopNumber; i++) {
            synchronized (this) {
                while (this.flag != waitFlag) {
                    try {
                        this.wait();
                    } catch (InterruptedException e) {
                        e.printStackTrace();
                    }
                }
                System.out.print(str);
                flag = nextFlag;
                this.notifyAll();
            }
        }
    }
}

public class Test13 {
    public static void main(String[] args) {
        SyncWaitNotify syncWaitNotify = new SyncWaitNotify(1, 5);
        new Thread(() -> {
            syncWaitNotify.print(1, 2, "a");
        }).start();
        new Thread(() -> {
            syncWaitNotify.print(2, 3, "b");
        }).start();
        new Thread(() -> {
            syncWaitNotify.print(3, 1, "c");
        }).start();
    }
}
abcabcabcabcabc
2.4、park & unpark原理
- LockSupport.park():用来阻塞当前调用线程
- LockSupport.unpark(目标线程):用于唤醒指定线程
每个线程都有自己的一个 Parker 对象,由三部分组成 _counter , _cond 和 _mutex。打个比喻:
- 线程就像一个旅人,Parker 就像他随身携带的背包,条件变量就好比背包中的帐篷。_counter 就好比背包中的备用干粮(0 为耗尽,1 为充足)
- 调用 park 就是要看需不需要停下来歇息。如果备用干粮耗尽,那么钻进帐篷歇息;如果备用干粮充足,那么不需停留,继续前进;
- 调用 unpark,就好比令干粮充足。如果这时线程还在帐篷,就唤醒让他继续前进;如果这时线程还在运行,那么下次他调用 park 时,仅是消耗掉备用干粮,不需停留继续前进,因为背包空间有限,多次调用 unpark 仅会补充一份备用干粮。
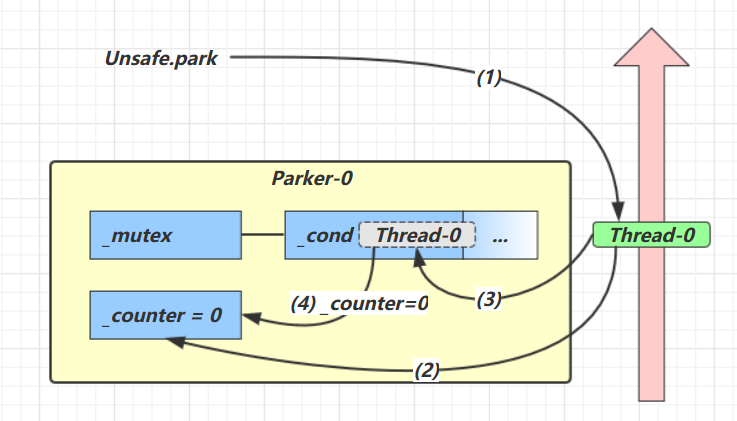
- 当前线程调用 Unsafe.park() 方法
- 检查 _counter ,本情况为 0,这时,获得 _mutex 互斥锁
- 线程进入 _cond 条件变量阻塞
- 设置 _counter = 0
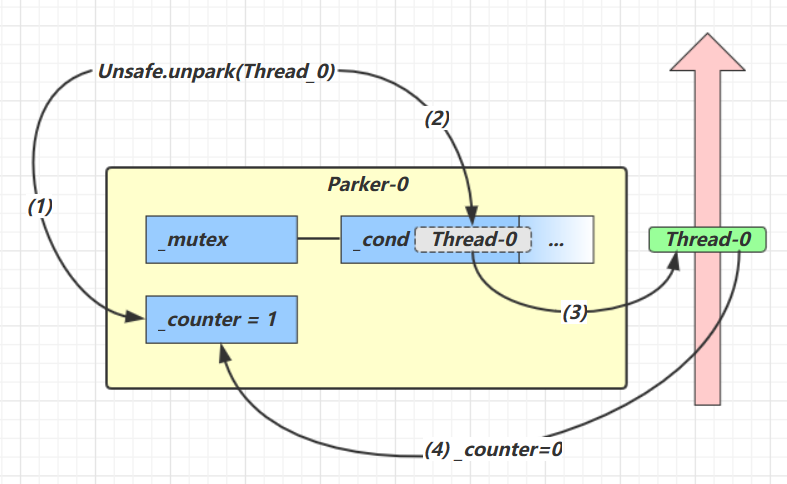
- 调用 Unsafe.unpark(Thread_0) 方法,设置 _counter 为 1
- 唤醒 _cond 条件变量中的 Thread_0
- Thread_0 恢复运行
- 设置 _counter 为 0
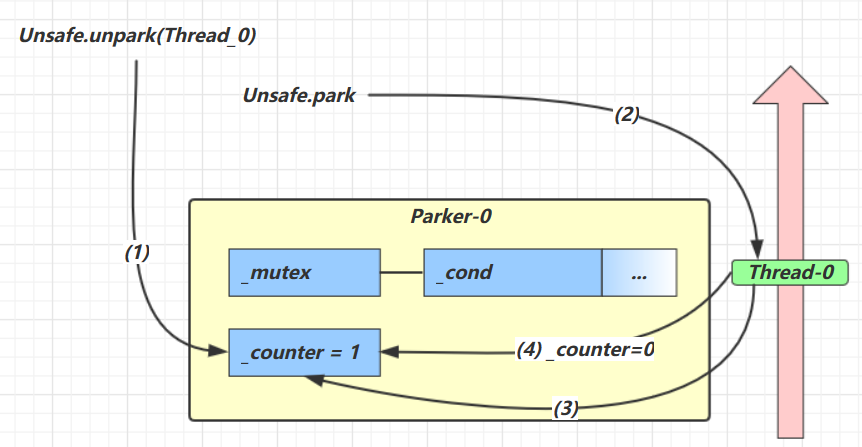
- 调用 Unsafe.unpark(Thread_0) 方法,设置 _counter 为 1
- 当前线程调用 Unsafe.park() 方法
- 检查 _counter ,本情况为 1,这时线程无需阻塞,继续运行
- 设置 _counter 为 0
2.4.1、同步模式之固定顺序
比如,必须先 2 后 1 打印输出。
public class Test14 {
    public static void main(String[] args) {
        Thread t1 = new Thread(() -> {
            LockSupport.park();
            System.out.println("1");
        });
        Thread t2 = new Thread(() -> {
            System.out.println("2");
            LockSupport.unpark(t1);
        });
        t1.start();
        t2.start();
    }
}
2
1
2.4.2、同步模式之交替输出
线程 1 输出 a 5 次,线程 2 输出 b 5 次,线程 3 输出 c 5 次。现在要求输出 abcabcabcabcabc 怎么实现?
class SyncPark {
    private int loopNumber;
    private Thread[] threads;

    public SyncPark(int loopNumber) {
        this.loopNumber = loopNumber;
    }

    public void setThreads(Thread... threads) {
        this.threads = threads;
    }

    public void print(String str) {
        for (int i = 0; i < loopNumber; i++) {
            LockSupport.park();
            System.out.print(str);
            LockSupport.unpark(nextThread());
        }
    }

    private Thread nextThread() {
        Thread current = Thread.currentThread();
        int index = 0;
        for (int i = 0; i < threads.length; i++) {
            if (threads[i] == current) {
                index = i;
                break;
            }
        }
        if (index < threads.length - 1) {
            return threads[index + 1];
        } else {
            return threads[0];
        }
    }

    public void start() {
        for (Thread thread : threads) {
            thread.start();
        }
        LockSupport.unpark(threads[0]);
    }
}

public class Test15 {
    public static void main(String[] args) {
        SyncPark syncPark = new SyncPark(5);
        Thread t1 = new Thread(() -> {
            syncPark.print("a");
        });
        Thread t2 = new Thread(() -> {
            syncPark.print("b");
        });
        Thread t3 = new Thread(() -> {
            syncPark.print("c");
        });
        syncPark.setThreads(t1, t2, t3);
        syncPark.start();
    }
}
abcabcabcabcabc
2.5、线程的状态转换
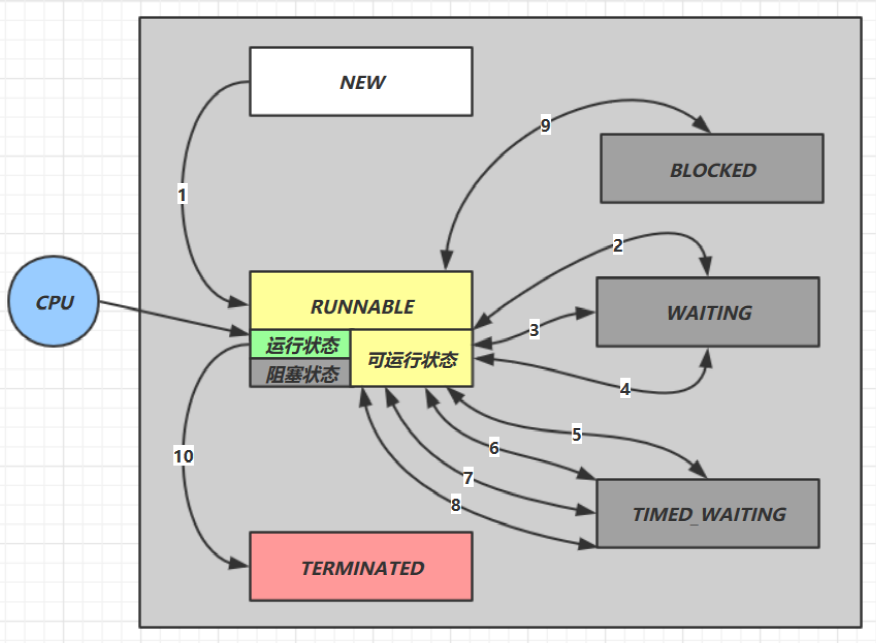
假设有线程 Thread t
情况 1 NEW --> RUNNABLE
- 当调用 t.start() 方法时,由 NEW --> RUNNABLE
@Slf4j
public class Test06 {
    public static void main(String[] args) {
        Thread thread = new Thread(() -> {
            System.out.println("thread run ...");
        });

        log.debug("start之前线程状态:{}", thread.getState());
        thread.start();
        log.debug("start之后线程状态:{}", thread.getState());
    }
}
15:37:44.318 [main] DEBUG com.caochenlei.Test06 - start之前线程状态:NEW
15:37:44.327 [main] DEBUG com.caochenlei.Test06 - start之后线程状态:RUNNABLE
thread run ...
情况 2 RUNNABLE <–> WAITING
t 线程用 synchronized(obj) 获取了对象锁后
- 调用 obj.wait() 方法时,t 线程从 RUNNABLE --> WAITING
- 调用 obj.notify() ,obj.notifyAll(),t.interrupt() 时
- 竞争锁成功,t 线程从 WAITING --> RUNNABLE
- 竞争锁失败,t 线程从 WAITING --> BLOCKED
@Slf4j
public class Test07 {
    static final Object obj = new Object();

    public static void main(String[] args) {
        Thread t1 = new Thread(() -> {
            synchronized (obj) {
                log.debug("执行....");
                try {
                    obj.wait();
                } catch (InterruptedException e) {
                    e.printStackTrace();
                }
                log.debug("其它代码...."); // 断点
                log.debug("t1状态:{}", Thread.currentThread().getState());
            }
        }, "t1");
        t1.start();
        log.debug("t1状态:{}", t1.getState());
        Thread t2 = new Thread(() -> {
            synchronized (obj) {
                log.debug("执行....");
                try {
                    obj.wait();
                } catch (InterruptedException e) {
                    e.printStackTrace();
                }
                log.debug("其它代码...."); // 断点
                log.debug("t2状态:{}", Thread.currentThread().getState());
            }
        }, "t2");
        t2.start();
        log.debug("t2状态:{}", t2.getState());
        try {
            Thread.sleep(1000);
        } catch (InterruptedException e) {
            e.printStackTrace();
        }
        log.debug("唤醒 obj 上其它线程");
        synchronized (obj) {
            log.debug("notifyAll之前t1状态:{}", t1.getState());
            log.debug("notifyAll之前t2状态:{}", t2.getState());
            obj.notifyAll(); // 唤醒obj上所有等待线程 断点
        }
    }
}
15:49:43.641 [main] DEBUG com.caochenlei.Test07 - t1状态:RUNNABLE
15:49:43.645 [t1] DEBUG com.caochenlei.Test07 - 执行....
15:49:43.650 [main] DEBUG com.caochenlei.Test07 - t2状态:RUNNABLE
15:49:43.651 [t2] DEBUG com.caochenlei.Test07 - 执行....
15:49:44.662 [main] DEBUG com.caochenlei.Test07 - 唤醒 obj 上其它线程
15:49:44.662 [main] DEBUG com.caochenlei.Test07 - notifyAll之前t1状态:WAITING
15:49:44.662 [main] DEBUG com.caochenlei.Test07 - notifyAll之前t2状态:WAITING
15:49:44.662 [t2] DEBUG com.caochenlei.Test07 - 其它代码....
15:49:44.662 [t2] DEBUG com.caochenlei.Test07 - t2状态:RUNNABLE
15:49:44.662 [t1] DEBUG com.caochenlei.Test07 - 其它代码....
15:49:44.662 [t1] DEBUG com.caochenlei.Test07 - t1状态:RUNNABLE
情况 3 RUNNABLE <–> WAITING
- 当前线程调用 t.join() 方法时,当前线程从 RUNNABLE --> WAITING,注意是当前线程在 t 线程对象的监视器上等待
- t 线程运行结束,或调用了当前线程的 interrupt() 时,当前线程从 WAITING --> RUNNABLE
@Slf4j
public class Test08 {
    public static void main(String[] args) {
        Thread t1 = new Thread(() -> {
            System.out.println("t1 run ...");
            try {
                Thread.sleep(5000);
            } catch (InterruptedException e) {
                e.printStackTrace();
            }
        });

        Thread t2 = new Thread(() -> {
            System.out.println("t2 run ...");
            try {
                t1.join();
            } catch (InterruptedException e) {
                e.printStackTrace();
            }
        });

        t1.start();
        t2.start();
        log.debug("t2线程状态:{}", t2.getState());
        try {
            Thread.sleep(1000);
        } catch (InterruptedException e) {
            e.printStackTrace();
        }
        log.debug("t2线程状态:{}", t2.getState());
    }
}
17:03:27.729 [main] DEBUG com.caochenlei.Test08 - t2线程状态:RUNNABLE
t1 run ...
t2 run ...
17:03:28.744 [main] DEBUG com.caochenlei.Test08 - t2线程状态:WAITING
情况 4 RUNNABLE <–> WAITING
- 当前线程调用 LockSupport.park() 方法会让当前线程从 RUNNABLE --> WAITING
- 调用 LockSupport.unpark(目标线程) 或调用了t线程的 interrupt() ,会让目标线程从 WAITING --> RUNNABLE
@Slf4j
public class Test09 {
    public static void main(String[] args) {
        Thread thread = new Thread(() -> {
            log.debug("park...");
            LockSupport.park();
            log.debug("unpark...");
            while (true) ;
        });

        thread.start();
        log.debug("thread线程状态:{}", thread.getState());
        try {
            Thread.sleep(1000);
        } catch (InterruptedException e) {
            e.printStackTrace();
        }
        log.debug("park之后thread线程状态:{}", thread.getState());

        LockSupport.unpark(thread);
        //thread.interrupt();
        try {
            Thread.sleep(1000);
        } catch (InterruptedException e) {
            e.printStackTrace();
        }
        log.debug("unpark之后thread线程状态:{}", thread.getState());
    }
}
17:05:55.897 [Thread-0] DEBUG com.caochenlei.Test09 - park...
17:05:55.897 [main] DEBUG com.caochenlei.Test09 - thread线程状态:RUNNABLE
17:05:56.916 [main] DEBUG com.caochenlei.Test09 - park之后thread线程状态:WAITING
17:05:56.916 [Thread-0] DEBUG com.caochenlei.Test09 - unpark...
17:05:57.928 [main] DEBUG com.caochenlei.Test09 - unpark之后thread线程状态:RUNNABLE
情况 5 RUNNABLE <–> TIMED_WAITING
t 线程用 synchronized(obj) 获取了对象锁后
- 调用 obj.wait(long n) 方法时,t 线程从 RUNNABLE --> TIMED_WAITING
- t 线程等待时间超过了 n 毫秒,或调用 obj.notify() , obj.notifyAll() , t.interrupt() 时
- 竞争锁成功,t 线程从 TIMED_WAITING --> RUNNABLE
- 竞争锁失败,t 线程从 TIMED_WAITING --> BLOCKED
情况 6 RUNNABLE <–> TIMED_WAITING
- 当前线程调用 t.join(long n) 方法时,当前线程从 RUNNABLE --> TIMED_WAITING,注意是当前线程在 t 线程对象的监视器上等待
- 当前线程等待时间超过了 n 毫秒,或 t 线程运行结束,或调用了当前线程的 interrupt() 时,当前线程从 TIMED_WAITING --> RUNNABLE
情况 7 RUNNABLE <–> TIMED_WAITING
- 当前线程调用 Thread.sleep(long n) ,当前线程从 RUNNABLE --> TIMED_WAITING
- 当前线程等待时间超过了 n 毫秒,当前线程从 TIMED_WAITING --> RUNNABLE
情况 8 RUNNABLE <–> TIMED_WAITING
- 当前线程调用 LockSupport.parkNanos(long nanos) 或 LockSupport.parkUntil(long millis) 时,当前线程从 RUNNABLE --> TIMED_WAITING
- 调用 LockSupport.unpark(目标线程) 或调用了线程 的 interrupt() ,或是等待超时,会让目标线程从 TIMED_WAITING–> RUNNABLE
情况 9 RUNNABLE <–> BLOCKED
- t 线程用 synchronized(obj) 获取了对象锁时如果竞争失败,从 RUNNABLE --> BLOCKED
- 持 obj 锁线程的同步代码块执行完毕,会唤醒该对象上所有 BLOCKED 的线程重新竞争,如果其中 t 线程竞争成功,从 BLOCKED --> RUNNABLE ,其它失败的线程仍然 BLOCKED
情况 10 RUNNABLE <–> TERMINATED
- 当前线程所有代码运行完毕,进入TERMINATED
2.6、锁进阶之多把锁
一间大屋子有两个功能:睡觉、学习,互不相干。
现在小南要学习,小女要睡觉,但如果只用一间屋子(一个对象锁)的话,那么并发度很低。
我们可以将锁的粒度细分,好处是可以增强并发度,坏处是如果一个线程需要同时获得多把锁,就容易发生死锁(后边介绍)。
@Slf4j
class BigRoom {
    private final Object studyRoom = new Object();
    private final Object bedRoom = new Object();

    public void sleep() {
        synchronized (bedRoom) {
            log.debug("sleeping 2 小时");
        }
    }

    public void study() {
        synchronized (studyRoom) {
            log.debug("study 1 小时");
        }
    }
}

public class Test16 {
    public static void main(String[] args) {
        BigRoom bigRoom = new BigRoom();
        new Thread(() -> {
            bigRoom.study();
        }, "小南").start();
        new Thread(() -> {
            bigRoom.sleep();
        }, "小女").start();
    }
}
10:00:13.809 [小南] DEBUG com.caochenlei.BigRoom - study 1 小时
10:00:13.809 [小女] DEBUG com.caochenlei.BigRoom - sleeping 2 小时
2.7、锁进阶之活跃性
2.7.1、死锁
有这样的情况:一个线程需要同时获取多把锁,这时就容易发生死锁。
假设,t1线程获得A对象锁,接下来想获取B对象的锁,t2线程获得B对象锁,接下来想获取A对象的锁,结果导致互相等待,造成死锁。
检测死锁可以使用 jconsole 工具,或者使用 jps 定位进程 id,再用 jstack 定位死锁。
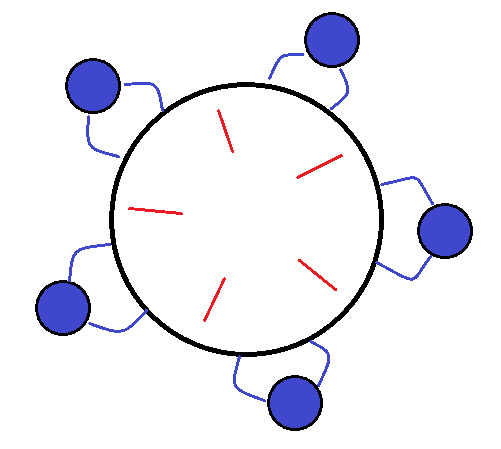
有一个著名的问题,哲学家就餐问题:
有五位哲学家,围坐在圆桌旁。他们只做两件事,思考和吃饭,思考一会吃口饭,吃完饭后接着思考。吃饭时要用两根筷子吃,桌上共有 5 根筷子,每位哲学家左右手边各有一根筷子。如果筷子被身边的人拿着,自己就得等待。
@Slf4j
class Chopstick {
    String name;

    public Chopstick(String name) {
        this.name = name;
    }

    @Override
    public String toString() {
        return "筷子{" + name + '}';
    }
}

@Slf4j
class Philosopher extends Thread {
    Chopstick left;
    Chopstick right;

    public Philosopher(String name, Chopstick left, Chopstick right) {
        super(name);
        this.left = left;
        this.right = right;
    }

    private void eat() {
        log.debug("eating...");
        try {
            Thread.sleep(1000);
        } catch (InterruptedException e) {
            e.printStackTrace();
        }
    }

    @Override
    public void run() {
        while (true) {
            synchronized (left) {// 获得左手筷子
                synchronized (right) {// 获得右手筷子
                    eat();// 吃饭
                }
            } // 放下右手筷子
        }// 放下左手筷子
    }
}

public class Test17 {
    public static void main(String[] args) {
        Chopstick c1 = new Chopstick("1");
        Chopstick c2 = new Chopstick("2");
        Chopstick c3 = new Chopstick("3");
        Chopstick c4 = new Chopstick("4");
        Chopstick c5 = new Chopstick("5");
        new Philosopher("苏格拉底", c1, c2).start();
        new Philosopher("柏拉图", c2, c3).start();
        new Philosopher("亚里士多德", c3, c4).start();
        new Philosopher("赫拉克利特", c4, c5).start();
        new Philosopher("阿基米德", c5, c1).start();
    }
}
16:55:42.379 [亚里士多德] DEBUG com.caochenlei.Philosopher - eating...
16:55:42.380 [苏格拉底] DEBUG com.caochenlei.Philosopher - eating...
16:55:43.399 [阿基米德] DEBUG com.caochenlei.Philosopher - eating...
16:55:44.407 [赫拉克利特] DEBUG com.caochenlei.Philosopher - eating...
16:55:45.418 [赫拉克利特] DEBUG com.caochenlei.Philosopher - eating...
2.7.2、活锁
活锁出现在两个线程互相改变对方的结束条件,最后谁也无法结束,例如:
public class Test18 {
    public static volatile int count = 10;

    public static void main(String[] args) {
        new Thread(() -> {
            // 期望减到 0 退出循环
            while (count > 0) {
                try {
                    Thread.sleep(200);
                } catch (InterruptedException e) {
                    e.printStackTrace();
                }
                count--;
                log.debug("count: {}", count);
            }
        }, "t1").start();
        new Thread(() -> {
            // 期望超过 20 退出循环
            while (count < 20) {
                try {
                    Thread.sleep(200);
                } catch (InterruptedException e) {
                    e.printStackTrace();
                }
                count++;
                log.debug("count: {}", count);
            }
        }, "t2").start();
    }
}
20:25:55.950 [t2] DEBUG com.caochenlei.Test18 - count: 12
20:25:55.952 [t1] DEBUG com.caochenlei.Test18 - count: 11
20:25:56.156 [t1] DEBUG com.caochenlei.Test18 - count: 10
20:25:56.156 [t2] DEBUG com.caochenlei.Test18 - count: 11
20:25:56.362 [t2] DEBUG com.caochenlei.Test18 - count: 11
20:25:56.362 [t1] DEBUG com.caochenlei.Test18 - count: 10
20:25:56.569 [t1] DEBUG com.caochenlei.Test18 - count: 10
20:25:56.570 [t2] DEBUG com.caochenlei.Test18 - count: 11
20:25:56.774 [t2] DEBUG com.caochenlei.Test18 - count: 12
20:25:56.774 [t1] DEBUG com.caochenlei.Test18 - count: 11
20:25:56.979 [t2] DEBUG com.caochenlei.Test18 - count: 10
20:25:56.979 [t1] DEBUG com.caochenlei.Test18 - count: 10
//......
2.7.3、饥饿
很多教程中把饥饿定义为,一个线程由于优先级太低,始终得不到 CPU 调度执行,也不能够结束,饥饿的情况不易演示。
public class Test19 {
    public static void main(String[] args) {
        Chopstick c1 = new Chopstick("1");
        Chopstick c2 = new Chopstick("2");
        Chopstick c3 = new Chopstick("3");
        Chopstick c4 = new Chopstick("4");
        Chopstick c5 = new Chopstick("5");
        new Philosopher("苏格拉底", c1, c2).start();
        new Philosopher("柏拉图", c2, c3).start();
        new Philosopher("亚里士多德", c3, c4).start();
        new Philosopher("赫拉克利特", c4, c5).start();
        new Philosopher("阿基米德", c1, c5).start();
    }
}
20:34:20.464 [亚里士多德] DEBUG com.caochenlei.Philosopher - eating...
20:34:20.464 [苏格拉底] DEBUG com.caochenlei.Philosopher - eating...
20:34:21.481 [阿基米德] DEBUG com.caochenlei.Philosopher - eating...
20:34:21.481 [柏拉图] DEBUG com.caochenlei.Philosopher - eating...
20:34:22.495 [赫拉克利特] DEBUG com.caochenlei.Philosopher - eating...
20:34:23.503 [亚里士多德] DEBUG com.caochenlei.Philosopher - eating...
20:34:24.518 [赫拉克利特] DEBUG com.caochenlei.Philosopher - eating...
20:34:24.518 [柏拉图] DEBUG com.caochenlei.Philosopher - eating...
20:34:25.527 [赫拉克利特] DEBUG com.caochenlei.Philosopher - eating...
20:34:25.527 [柏拉图] DEBUG com.caochenlei.Philosopher - eating...
20:34:26.538 [苏格拉底] DEBUG com.caochenlei.Philosopher - eating...
20:34:26.538 [赫拉克利特] DEBUG com.caochenlei.Philosopher - eating...
20:34:27.547 [赫拉克利特] DEBUG com.caochenlei.Philosopher - eating...
20:34:28.559 [赫拉克利特] DEBUG com.caochenlei.Philosopher - eating...
20:34:29.571 [赫拉克利特] DEBUG com.caochenlei.Philosopher - eating...
20:34:30.581 [亚里士多德] DEBUG com.caochenlei.Philosopher - eating...
20:34:31.590 [赫拉克利特] DEBUG com.caochenlei.Philosopher - eating...
20:34:32.601 [亚里士多德] DEBUG com.caochenlei.Philosopher - eating...
20:34:33.609 [赫拉克利特] DEBUG com.caochenlei.Philosopher - eating...
20:34:34.611 [赫拉克利特] DEBUG com.caochenlei.Philosopher - eating...
20:34:35.617 [赫拉克利特] DEBUG com.caochenlei.Philosopher - eating...
//......赫拉克利特执行的多,有的哲学家吃不到饭,也就是线程饥饿,但是解决了死锁问题,后边会解决饥饿问题
2.8、ReentrantLock
2.8.1、锁介绍
ReentrantLock 相对于 synchronized,它具备如下特点:
- 可中断
- 可以设置超时时间
- 可以设置为公平锁
- 支持多个条件变量
- 与 synchronized 一样,都支持可重入
基本语法:
// 创建锁
ReentrantLock reentrantLock = new ReentrantLock();
// 获取锁
reentrantLock.lock();
try {
    // 临界区
} finally {
    // 释放锁
    reentrantLock.unlock();
}
2.8.2、可重入
可重入是指同一个线程,如果首次获得了这把锁,那么因为它是这把锁的拥有者,因此有权利再次获取这把锁,如果是不可重入锁,那么第二次获得锁时,自己也会被锁挡住。
@Slf4j
public class Test20 {
    public static ReentrantLock lock = new ReentrantLock();

    public static void main(String[] args) {
        method1();
    }

    public static void method1() {
        lock.lock();
        try {
            log.debug("execute method1");
            method2();
        } finally {
            lock.unlock();
        }
    }

    public static void method2() {
        lock.lock();
        try {
            log.debug("execute method2");
            method3();
        } finally {
            lock.unlock();
        }
    }

    public static void method3() {
        lock.lock();
        try {
            log.debug("execute method3");
        } finally {
            lock.unlock();
        }
    }
}
21:15:36.111 [main] DEBUG com.caochenlei.Test20 - execute method1
21:15:36.141 [main] DEBUG com.caochenlei.Test20 - execute method2
21:15:36.141 [main] DEBUG com.caochenlei.Test20 - execute method3
2.8.3、可打断
ReentrantLock 支持可打断,如果是不可中断模式,那么即使使用了 interrupt 也不会让等待中断。
@Slf4j
public class Test21 {
    public static ReentrantLock lock = new ReentrantLock();

    public static void main(String[] args) {
        Thread t1 = new Thread(() -> {
            log.debug("启动...");
            try {
                lock.lockInterruptibly();
            } catch (InterruptedException e) {
                e.printStackTrace();
                log.debug("等锁的过程中被打断");
                return;
            }
            try {
                log.debug("获得了锁");
            } finally {
                lock.unlock();
            }
        }, "t1");
        lock.lock();
        log.debug("获得了锁");
        t1.start();
        try {
            Thread.sleep(1000);
            t1.interrupt();
            log.debug("执行打断");
        } catch (InterruptedException e) {
            e.printStackTrace();
        } finally {
            lock.unlock();
        }
    }
}
21:19:43.728 [main] DEBUG com.caochenlei.Test21 - 获得了锁
21:19:43.735 [t1] DEBUG com.caochenlei.Test21 - 启动...
21:19:44.744 [main] DEBUG com.caochenlei.Test21 - 执行打断
21:19:44.745 [t1] DEBUG com.caochenlei.Test21 - 等锁的过程中被打断
java.lang.InterruptedException
    at com.caochenlei.Test21.lambda$main$0(Test21.java:15)
2.8.4、锁超时
@Slf4j
public class Test22 {
    public static ReentrantLock lock = new ReentrantLock();

    public static void main(String[] args) {
        Thread t1 = new Thread(() -> {
            log.debug("启动...");
            if (!lock.tryLock()) {
                log.debug("获取失败,返回");
                return;
            }
            try {
                log.debug("获得了锁");
            } finally {
                lock.unlock();
            }
        }, "t1");
        lock.lock();
        log.debug("获得了锁");
        t1.start();
        try {
            Thread.sleep(2000);
        } catch (InterruptedException e) {
            e.printStackTrace();
        } finally {
            lock.unlock();
        }
    }
}
21:39:41.239 [main] DEBUG com.caochenlei.Test22 - 获得了锁
21:39:41.247 [t1] DEBUG com.caochenlei.Test22 - 启动...
21:39:41.247 [t1] DEBUG com.caochenlei.Test22 - 获取失败,返回
2.8.5、公平锁
ReentrantLock 默认是不公平的,改为公平锁语法如下,公平锁一般没有必要,会降低并发度。
ReentrantLock lock = new ReentrantLock(true);
2.8.6、条件变量
synchronized 中也有条件变量,就是我们讲原理时那个 waitSet 休息室,当条件不满足时进入 waitSet 等待,ReentrantLock 的条件变量比 synchronized 强大之处在于,它是支持多个条件变量的,这就好比 synchronized 是那些不满足条件的线程都在一间休息室等消息,而 ReentrantLock 支持多间休息室,有专门等烟的休息室、专门等早餐的休息室、唤醒时也是按休息室来唤醒。
使用要点:
- await 前需要获得锁
- await 执行后,会释放锁,进入 conditionObject 等待
- await 的线程被唤醒(或打断、或超时)去重新竞争 lock 锁
- 竞争 lock 锁成功后,从 await 后继续执行
@Slf4j
public class Test23 {
    public static ReentrantLock lock = new ReentrantLock();
    public static Condition waitCigaretteQueue = lock.newCondition();
    public static Condition waitbreakfastQueue = lock.newCondition();
    public static volatile boolean hasCigrette = false;
    public static volatile boolean hasBreakfast = false;

    public static void main(String[] args) throws InterruptedException {
        new Thread(() -> {
            try {
                lock.lock();
                while (!hasCigrette) {
                    try {
                        waitCigaretteQueue.await();
                    } catch (InterruptedException e) {
                        e.printStackTrace();
                    }
                }
                log.debug("等到了它的烟");
            } finally {
                lock.unlock();
            }
        }).start();
        new Thread(() -> {
            try {
                lock.lock();
                while (!hasBreakfast) {
                    try {
                        waitbreakfastQueue.await();
                    } catch (InterruptedException e) {
                        e.printStackTrace();
                    }
                }
                log.debug("等到了它的早餐");
            } finally {
                lock.unlock();
            }
        }).start();
        Thread.sleep(1000);
        sendBreakfast();
        Thread.sleep(1000);
        sendCigarette();
    }

    private static void sendCigarette() {
        lock.lock();
        try {
            log.debug("送烟来了");
            hasCigrette = true;
            waitCigaretteQueue.signal();
        } finally {
            lock.unlock();
        }
    }

    private static void sendBreakfast() {
        lock.lock();
        try {
            log.debug("送早餐来了");
            hasBreakfast = true;
            waitbreakfastQueue.signal();
        } finally {
            lock.unlock();
        }
    }
}
21:45:25.187 [main] DEBUG com.caochenlei.Test23 - 送早餐来了
21:45:25.192 [Thread-1] DEBUG com.caochenlei.Test23 - 等到了它的早餐
21:45:26.195 [main] DEBUG com.caochenlei.Test23 - 送烟来了
21:45:26.195 [Thread-0] DEBUG com.caochenlei.Test23 - 等到了它的烟
2.8.7、交替输出
线程 1 输出 a 5 次,线程 2 输出 b 5 次,线程 3 输出 c 5 次。现在要求输出 abcabcabcabcabc 怎么实现?
class AwaitSignal extends ReentrantLock {
    private int loopNumber;// 循环次数

    public AwaitSignal(int loopNumber) {
        this.loopNumber = loopNumber;
    }

    public void start(Condition first) {
        this.lock();
        try {
            first.signal();
        } finally {
            this.unlock();
        }
    }

    public void print(String str, Condition current, Condition next) {
        for (int i = 0; i < loopNumber; i++) {
            this.lock();
            try {
                current.await();
                System.out.print(str);
                next.signal();
            } catch (InterruptedException e) {
                e.printStackTrace();
            } finally {
                this.unlock();
            }
        }
    }
}

public class Test24 {
    public static void main(String[] args) {
        AwaitSignal as = new AwaitSignal(5);
        Condition aWaitSet = as.newCondition();
        Condition bWaitSet = as.newCondition();
        Condition cWaitSet = as.newCondition();
        new Thread(() -> {
            as.print("a", aWaitSet, bWaitSet);
        }).start();
        new Thread(() -> {
            as.print("b", bWaitSet, cWaitSet);
        }).start();
        new Thread(() -> {
            as.print("c", cWaitSet, aWaitSet);
        }).start();
        as.start(aWaitSet);
    }
}
abcabcabcabcabc
第三章 共享模型之内存
3.1、内存模型
JMM,即为Java内存模型(java memory model)。因为在不同的硬件生产商和不同的操作系统下,内存的访问逻辑有一定的差异,结果就是当你的代码在某个系统环境下运行良好,并且线程安全,但是换了个系统就出现各种问题。Java内存模型,就是为了屏蔽系统和硬件的差异,让一套代码在不同平台下能到达相同的访问结果。JMM从Java 5开始的JSR-133发布后,已经成熟和完善起来。
3.2、内存划分
JMM规定了内存主要划分为主内存和工作内存两种。此处的主内存和工作内存跟JVM内存划分(堆、栈、方法区)是在不同的层次上进行的,如果非要对应起来,主内存对应的是Java堆中的对象实例部分,工作内存对应的是栈中的部分区域,从更底层的来说,主内存对应的是硬件的物理内存,工作内存对应的是寄存器和高速缓存。
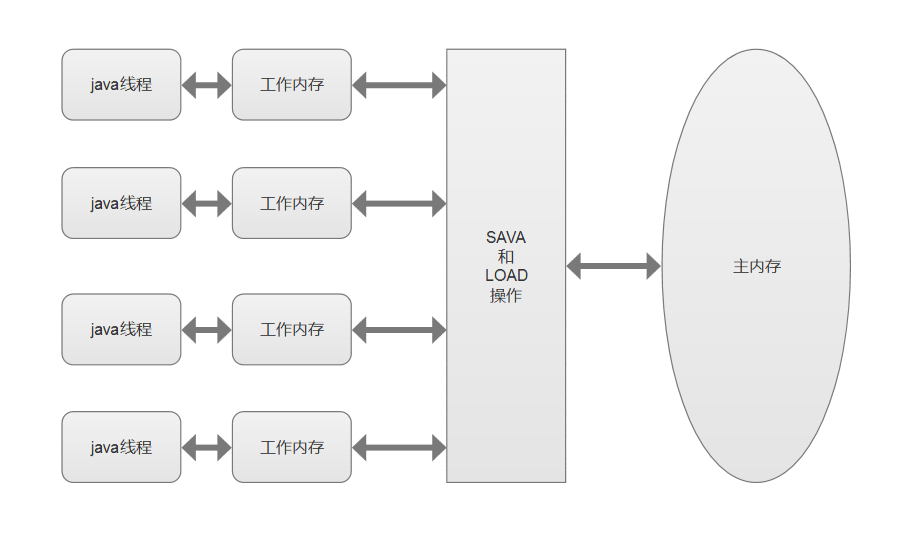
JVM在设计时候考虑到,如果Java线程每次读取和写入变量都直接操作主内存,对性能影响比较大,所以每条线程拥有各自的工作内存,工作内存中的变量是主内存中的一份拷贝,线程对变量的读取和写入,直接在工作内存中操作,而不能直接去操作主内存中的变量。但是这样就会出现一个问题,当一个线程修改了自己工作内存中变量,对其他线程是不可见的,会导致线程不安全的问题。因为JMM制定了一套标准来保证开发者在编写多线程程序的时候,能够控制什么时候内存会被同步给其他线程。
3.3、内存交互
内存交互操作有8种,虚拟机实现必须保证每一个操作都是原子的,不可在分的(对于double和long类型的变量来说,load、store、read和write操作在某些平台上允许例外)
- lock (锁定):作用于主内存的变量,把一个变量标识为线程独占状态
- unlock (解锁):作用于主内存的变量,它把一个处于锁定状态的变量释放出来,释放后的变量才可以被其他线程锁定
- read (读取):作用于主内存变量,它把一个变量的值从主内存传输到线程的工作内存中,以便随后的load动作使用
- load (载入):作用于工作内存的变量,它把read操作从主存中变量放入工作内存中
- use (使用):作用于工作内存中的变量,它把工作内存中的变量传输给执行引擎,每当虚拟机遇到一个需要使用到变量的值,就会使用到这个指令
- assign (赋值):作用于工作内存中的变量,它把一个从执行引擎中接受到的值放入工作内存的变量副本中
- store (存储):作用于主内存中的变量,它把一个从工作内存中一个变量的值传送到主内存中,以便后续的write使用
- write (写入):作用于主内存中的变量,它把store操作从工作内存中得到的变量的值放入主内存的变量中
JMM对这八种指令的使用,制定了如下规则:
- 不允许read和load、store和write操作之一单独出现。即使用了read必须load,使用了store必须write
- 不允许线程丢弃他最近的assign操作,即工作变量的数据改变了之后,必须告知主存
- 不允许一个线程将没有assign的数据从工作内存同步回主内存
- 一个新的变量必须在主内存中诞生,不允许工作内存直接使用一个未被初始化的变量。就是对变量实施use、store操作之前,必须经过assign和load操作
- 一个变量同一时间只有一个线程能对其进行lock。多次lock后,必须执行相同次数的unlock才能解锁
- 如果对一个变量进行lock操作,会清空所有工作内存中此变量的值,在执行引擎使用这个变量前,必须重新load或assign操作初始化变量的值
- 如果一个变量没有被lock,就不能对其进行unlock操作。也不能unlock一个被其他线程锁住的变量
- 对一个变量进行unlock操作之前,必须把此变量同步回主内存
3.4、模型特征
- 原子性: 例如上面八项操作,在操作系统里面是不可分割的单元。被synchronized关键字或其他锁包裹起来的操作也可以认为是原子的。从一个线程观察另外一个线程的时候,看到的都是一个个原子性的操作。
synchronized (this) {
    a=1;
    b=2;
}
- 可见性: 每个工作线程都有自己的工作内存,所以当某个线程修改完某个变量之后,在其他的线程中,未必能观察到该变量已经被修改。volatile关键字要求被修改之后的变量要求立即更新到主内存,每次使用前从主内存处进行读取。因此volatile可以保证可见性。除了volatile以外,synchronized和final也能实现可见性。synchronized保证unlock之前必须先把变量刷新回主内存。final修饰的字段在构造器中一旦完成初始化,并且构造器没有this逸出,那么其他线程就能看到final字段的值。
public class Test25 {
    // main 线程对 run 变量的修改对于 t 线程不可见,导致了 t 线程无法停止
    // 解决办法:加上关键字 volatile ,他可以避免线程从自己的工作缓存中查找变量的值,必须到主存中获取它的值
    // 线程操作 volatile 变量都是直接操作主存,这就体现了可见性
    public static volatile boolean run = true;

    public static void main(String[] args) throws InterruptedException {
        Thread t = new Thread(() -> {
            while (true) {
                if (!run) {
                    break;
                }
            }
        });
        t.start();

        // 预期效果:1s钟以后 t 线程停止
        Thread.sleep(1000);
        run = false;
    }
}
- 有序性: Java的有序性跟线程相关。如果在线程内部观察,会发现当前线程的一切操作都是有序的。如果在线程的外部来观察的话,会发现线程的所有操作都是无序的。因为JMM的工作内存和主内存之间存在延迟,而且Java会对一些指令进行重新排序。volatile和synchronized可以保证程序的有序性,很多程序员只理解这两个关键字的执行互斥,而没有很好的理解到volatile和synchronized也能保证指令不进行重排序。
3.5、同步模式之任务犹豫
Balking(犹豫)模式用在一个线程发现另一个线程或本线程已经做了某一件相同的事,那么本线程就无需再做了,直接结束返回即可。
@Slf4j
class MonitorService {
    private volatile boolean isStart;

    public void start() {
        log.info("尝试启动监控线程...");
        synchronized (this) {
            if (isStart) {
                return;
            }
            isStart = true;
        }
        log.info("真正启动监控线程...");
    }
}

public class Test27 {
    public static void main(String[] args) {
        MonitorService monitorService = new MonitorService();
        monitorService.start();
        monitorService.start();
        monitorService.start();
        monitorService.start();
    }
}
20:38:10.860 [main] INFO com.caochenlei.MonitorService - 尝试启动监控线程...
20:38:10.865 [main] INFO com.caochenlei.MonitorService - 真正启动监控线程...
20:38:10.865 [main] INFO com.caochenlei.MonitorService - 尝试启动监控线程...
20:38:10.865 [main] INFO com.caochenlei.MonitorService - 尝试启动监控线程...
20:38:10.865 [main] INFO com.caochenlei.MonitorService - 尝试启动监控线程...
3.6、终止模式之优雅终止
在一个线程 T1 中如何“优雅”终止线程 T2?这里的【优雅】指的是给 T2 一个料理后事的机会。
@Slf4j
class TwoPhaseTermination {
    private Thread monitorThread;
    private volatile boolean isStart = false;
    private volatile boolean isStop = false;

    // 启动监控线程
    public void start() {
        synchronized (this) {
            if (isStart) {
                return;
            }
            isStart = true;
        }
        monitorThread = new Thread(() -> {
            while (true) {
                // 是否被打断
                if (isStop) {
                    log.debug("停止监控记录");
                    break;
                }
                // 执行的业务
                try {
                    Thread.sleep(1000);
                    log.debug("执行监控记录");
                } catch (InterruptedException e) {
                    e.printStackTrace();
                }
            }
        }, "monitor");
        monitorThread.start();
    }

    // 停止监控线程
    public void stop() {
        isStop = true;
        monitorThread.interrupt();
    }
}

public class Test26 {
    public static void main(String[] args) throws InterruptedException {
        TwoPhaseTermination tpt = new TwoPhaseTermination();
        tpt.start();
        Thread.sleep(5000);
        tpt.stop();
    }
}
20:40:18.956 [monitor] DEBUG com.caochenlei.TwoPhaseTermination - 执行监控记录
20:40:19.974 [monitor] DEBUG com.caochenlei.TwoPhaseTermination - 执行监控记录
20:40:20.987 [monitor] DEBUG com.caochenlei.TwoPhaseTermination - 执行监控记录
20:40:21.993 [monitor] DEBUG com.caochenlei.TwoPhaseTermination - 执行监控记录
java.lang.InterruptedException: sleep interrupted
	at java.lang.Thread.sleep(Native Method)
    at com.caochenlei.TwoPhaseTermination.lambda$start$0(Test26.java:28)
20:40:22.950 [monitor] DEBUG com.caochenlei.TwoPhaseTermination - 停止监控记录
3.7、happens-before
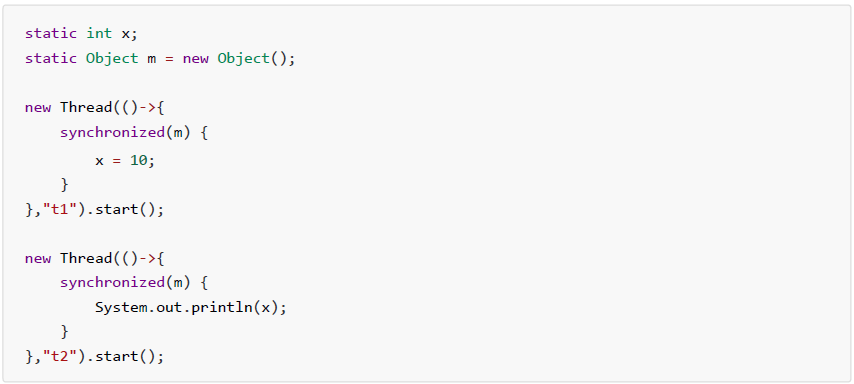
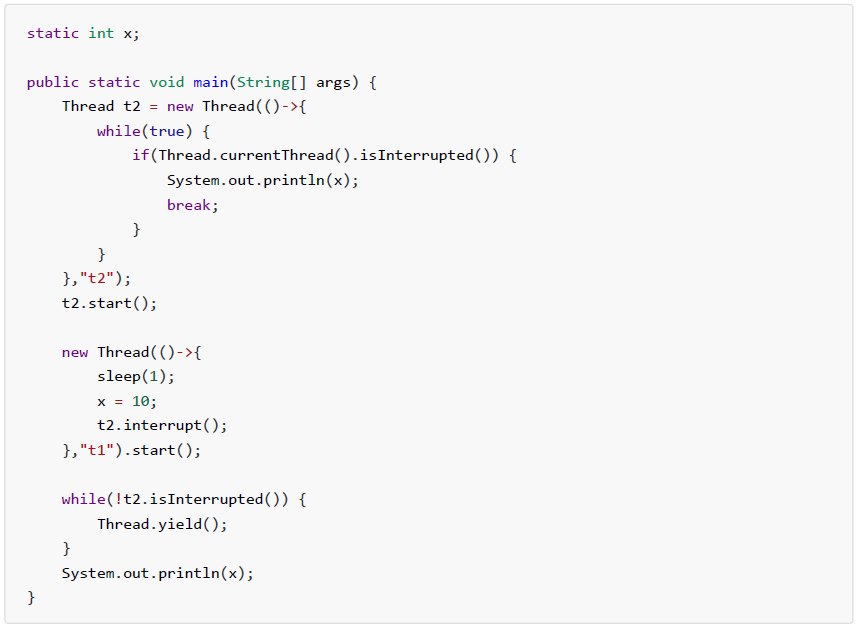
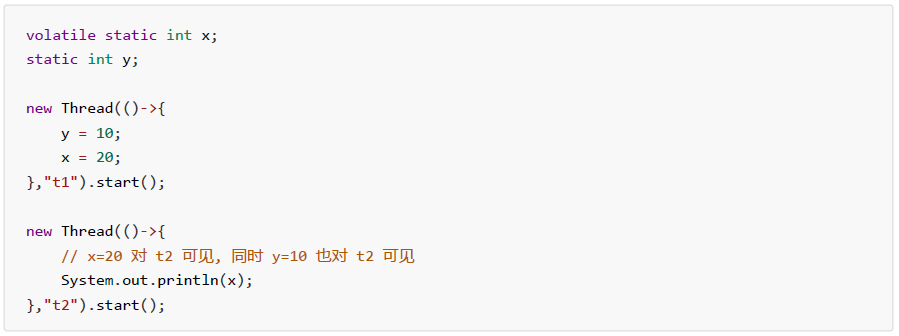
happens-before 规定了对共享变量的写操作对其它线程的读操作可见,它是可见性与有序性的一套规则总结,抛开以下 happens-before 规则,JMM 并不能保证一个线程对共享变量的写,对于其它线程对该共享变量的读可见。
- 线程解锁 m 之前对变量的写,对于接下来对 m 加锁的其它线程对该变量的读可见
- 线程对 volatile 变量的写,对接下来其它线程对该变量的读可见

- 线程 start 前对变量的写,对该线程开始后对该变量的读可见

- 线程结束前对变量的写,对其它线程得知它结束后的读可见(比如其它线程调用 t1.isAlive() 或 t1.join()等待它结束)

- 线程 t1 打断 t2 前对变量的写,对于其他线程得知 t2 被打断后对变量的读可见(通过t2.interrupted 或 t2.isInterrupted)
- 对变量(成员变量或静态成员变量)默认值(0,false,null)的写,对其它线程对该变量的读可见
第四章 共享模型之无锁
4.1、无锁示例
有一个账户余额 1000 元,开启 10 个线程,每个线程减少 100 元,最终减少到 0 元。要求使用 CAS。
class Account {
    private AtomicInteger balance;

    // 初始余额
    public Account(Integer balance) {
        this.balance = new AtomicInteger(balance);
    }

    // 获取余额
    public Integer getBalance() {
        return balance.get();
    }

    // 增加余额
    public void increase(Integer money) {
        while (true) {
            int prev = balance.get();
            int next = prev + money;
            if (balance.compareAndSet(prev, next)) {
                break;
            }
        }
    }

    // 减少余额
    public void decrease(Integer money) {
        while (true) {
            int prev = balance.get();
            int next = prev - money;
            if (balance.compareAndSet(prev, next)) {
                break;
            }
        }
    }
}

public class Test28 {
    public static void main(String[] args) throws InterruptedException {
        Account account = new Account(1000);
        List<Thread> threads = new ArrayList<>();
        for (int i = 0; i < 10; i++) {
            threads.add(new Thread(() -> { account.decrease(100); }));
        }
        for (int i = 0; i < 10; i++) {
            threads.get(i).start();
        }
        for (int i = 0; i < 10; i++) {
            threads.get(i).join();
        }
        System.out.println("money : " + account.getBalance());
    }
}
money : 0
4.2、原子整数
- AtomicBoolean
AtomicBoolean atomicBoolean = new AtomicBoolean(false);

// 获取当前 atomicBoolean 的值
System.out.println(atomicBoolean.get());

// 设置当前 atomicBoolean 的值
atomicBoolean.set(true);
System.out.println(atomicBoolean.get());

// 获取并设置 getAndSet 的值
System.out.println("获取并设置结果:" + atomicBoolean.getAndSet(false));
System.out.println(atomicBoolean.get());

// 比较并设置 atomicBoolean 的值,如果期望值不等于传入的第一个参数,则比较失败,返回false
System.out.println("比较并设置结果:" + atomicBoolean.compareAndSet(false, true));
System.out.println(atomicBoolean.get());
false
true
获取并设置结果:true
false
比较并设置结果:true
true
- AtomicInteger
- AtomicLong
以 AtomicInteger 为例:
AtomicInteger atomicInteger = new AtomicInteger(0);

// 获取并自增(i = 0, 结果 i = 1, 返回 0),类似于 i++
System.out.println(atomicInteger.getAndIncrement());

// 自增并获取(i = 1, 结果 i = 2, 返回 2),类似于 ++i
System.out.println(atomicInteger.incrementAndGet());

// 自减并获取(i = 2, 结果 i = 1, 返回 1),类似于 --i
System.out.println(atomicInteger.decrementAndGet());

// 获取并自减(i = 1, 结果 i = 0, 返回 1),类似于 i--
System.out.println(atomicInteger.getAndDecrement());

// 获取并加值(i = 0, 结果 i = 5, 返回 0)
System.out.println(atomicInteger.getAndAdd(5));

// 加值并获取(i = 5, 结果 i = 0, 返回 0)
System.out.println(atomicInteger.addAndGet(-5));

// 获取并更新(i = 0, p 为 i 的当前值, 结果 i = -2, 返回 0)
// 其中函数中的操作能保证原子,但函数需要无副作用
System.out.println(atomicInteger.getAndUpdate(p -> p - 2));

// 更新并获取(i = -2, p 为 i 的当前值, 结果 i = 0, 返回 0)
// 其中函数中的操作能保证原子,但函数需要无副作用
System.out.println(atomicInteger.updateAndGet(p -> p + 2));

// 获取并计算(i = 0, p 为 i 的当前值, x 为参数1, 结果 i = 10, 返回 0)
// 其中函数中的操作能保证原子,但函数需要无副作用
// getAndUpdate 如果在 lambda 中引用了外部的局部变量,要保证该局部变量是 final 的
// getAndAccumulate 可以通过 参数1 来引用外部的局部变量,但因为其不在 lambda 中因此不必是 final
System.out.println(atomicInteger.getAndAccumulate(10, (p, x) -> p + x));

// 计算并获取(i = 10, p 为 i 的当前值, x 为参数1, 结果 i = 0, 返回 0)
// 其中函数中的操作能保证原子,但函数需要无副作用
// updateAndGet 如果在 lambda 中引用了外部的局部变量,要保证该局部变量是 final 的
// accumulateAndGet 可以通过 参数1 来引用外部的局部变量,但因为其不在 lambda 中因此不必是 final
System.out.println(atomicInteger.accumulateAndGet(-10, (p, x) -> p + x));
4.3、原子引用
有些时候,我们不一定会使用基础类型作为共享变量,也可能会使用对象类型作为共享变量,如何确保在多线程下的线程安全呢?
- AtomicReference
class BigDecimalAccount {
    private AtomicReference<BigDecimal> balance;

    // 初始余额
    public BigDecimalAccount(BigDecimal balance) {
        this.balance = new AtomicReference<>(balance);
    }

    // 获取余额
    public BigDecimal getBalance() {
        return balance.get();
    }

    // 增加余额
    public void increase(BigDecimal money) {
        while (true) {
            BigDecimal prev = balance.get();
            BigDecimal next = prev.add(money);
            if (balance.compareAndSet(prev, next)) {
                break;
            }
        }
    }

    // 减少余额
    public void decrease(BigDecimal money) {
        while (true) {
            BigDecimal prev = balance.get();
            BigDecimal next = prev.subtract(money);
            if (balance.compareAndSet(prev, next)) {
                break;
            }
        }
    }
}

public class Test31 {
    public static void main(String[] args) throws InterruptedException {
        BigDecimalAccount account = new BigDecimalAccount(new BigDecimal(1000.00));
        List<Thread> threads = new ArrayList<>();
        for (int i = 0; i < 10; i++) {
            threads.add(new Thread(() -> { account.decrease(new BigDecimal(100.00)); }));
        }
        for (int i = 0; i < 10; i++) {
            threads.get(i).start();
        }
        for (int i = 0; i < 10; i++) {
            threads.get(i).join();
        }
        System.out.println("money : " + account.getBalance());
    }
}
money : 0
compareAndSet方法,首先先比较传递过来的参数是否是期望的值,如果是,才会修改,如果不是,则修改失败。
那有没有有一种可能,在 A 线程第二次修改的时候,虽然,他的期望值是 10,但是这个 10,是被 B 线程修改的,他以为别人没有动过,然后执行更改操作,其实中间已经被更改过了,这就是ABA问题。
AtomicInteger atomicInteger = new AtomicInteger(10);

// A 线程修改预期值10为 100
atomicInteger.compareAndSet(10,100);

// B 线程修改预期值100 为 10
atomicInteger.compareAndSet(100,10);

// A 线程修改预期值10 为 0
atomicInteger.compareAndSet(10,0);
为了解决这个问题,我们只需要在每一次的修改操作上加一个版本号,这样即使中间被修改过,也能知道,JDK就提供了一种带版本号的原子引用对象。
- AtomicStampedReference
AtomicStampedReference<Integer> asr = new AtomicStampedReference<>(10, 0);

// A 线程修改预期值10为 100
Integer prev = asr.getReference();//10
int stamp = asr.getStamp();//0
asr.compareAndSet(prev, 100, stamp, stamp + 1);
System.out.println(asr.getStamp());//1

// B 线程修改预期值100 为 10
prev = asr.getReference();//100
stamp = asr.getStamp();//1
asr.compareAndSet(prev, 10, stamp, stamp + 1);
System.out.println(asr.getStamp());//2

// A 线程修改预期值10 为 0
prev = asr.getReference();//10
stamp = asr.getStamp();//2
asr.compareAndSet(prev, 0, stamp, stamp + 1);
System.out.println(asr.getStamp());//3
AtomicStampedReference可以给原子引用加上版本号,追踪原子引用的变化过程: A -> B -> A,通过AtomicStampedReference,我们可以知道,引用变量中途被更改了几次。但是有时候,并不关心引用变量更改了几次,只是单纯的关心是否更改过,所以就有了
AtomicMarkableReference。
- AtomicMarkableReference
class GarbageBag {
    String desc;

    public GarbageBag(String desc) {
        this.desc = desc;
    }
}

public class Test34 {
    public static void main(String[] args) {
        GarbageBag garbageBag = new GarbageBag("垃圾已满");
        AtomicMarkableReference<GarbageBag> amr = new AtomicMarkableReference<>(garbageBag, true);

        // 如果垃圾已满,请及时清理
        GarbageBag prev = amr.getReference();
        System.out.println(amr.compareAndSet(prev, new GarbageBag("垃圾已空"), true, false));
        System.out.println(amr.isMarked());
    }
}
true
false
4.4、原子数组
- AtomicIntegerArray
- AtomicLongArray
- AtomicReferenceArray
以 AtomicIntegerArray 为例:
AtomicIntegerArray atomicIntegerArray = new AtomicIntegerArray(10);

for (int i = 0; i < atomicIntegerArray.length(); i++) {
    while (true) {
        int prev = atomicIntegerArray.get(i);
        int next = prev + i;
        if (atomicIntegerArray.compareAndSet(i, prev, next)) {
            break;
        }
    }
}

System.out.println(atomicIntegerArray);
[0, 1, 2, 3, 4, 5, 6, 7, 8, 9]
4.5、字段更新器
- AtomicIntegerFieldUpdater
- AtomicLongFieldUpdater
- AtomicReferenceFieldUpdater
以 AtomicIntegerFieldUpdater 为例:
class Person {
    volatile String name;
    volatile int age;

    public Person(String name, int age) {
        this.name = name;
        this.age = age;
    }

    @Override
    public String toString() {
        return "Person{" +
                "name='" + name + '\'' +
                ", age=" + age +
                '}';
    }
}

public class Test36 {
    public static void main(String[] args) {
        Person person = new Person("张三", 20);
        System.out.println(person);
        AtomicIntegerFieldUpdater updater = AtomicIntegerFieldUpdater.newUpdater(Person.class, "age");

        updater.compareAndSet(person, 20, 18);
        System.out.println(person);
    }
}
Person{name='张三', age=20}
Person{name='张三', age=18}
4.6、原子累加器
- LongAdder
LongAdder longAdder = new LongAdder();

longAdder.add(100L);
longAdder.add(200L);
longAdder.add(300L);
System.out.println(longAdder.sum());

longAdder.increment();
System.out.println(longAdder.sum());

longAdder.decrement();
System.out.println(longAdder.sum());
600
601
600
- DoubleAdder
DoubleAdder doubleAdder = new DoubleAdder();

doubleAdder.add(100.00D);
doubleAdder.add(200.00D);
doubleAdder.add(300.00D);
System.out.println(doubleAdder.sum());
600.0
4.7、Unsafe
Unsafe 对象提供了非常底层的,操作内存、线程的方法,Unsafe 对象不能直接调用,只能通过反射获得。不要被 Unsafe 的名称迷惑,Unsafe 是一个线程安全的类,他的名字本意是想告诉我们,如果由程序员来直接操作内存可能会有隐患。
编写工具类:
class UnsafeAccessor {
    static Unsafe unsafe;

    static {
        try {
            Field theUnsafe = Unsafe.class.getDeclaredField("theUnsafe");
            theUnsafe.setAccessible(true);
            unsafe = (Unsafe) theUnsafe.get(null);
        } catch (NoSuchFieldException | IllegalAccessException e) {
            throw new Error(e);
        }
    }

    static Unsafe getUnsafe() {
        return unsafe;
    }
}
模拟CAS操作:
class Student {
    volatile String name;
    volatile int age;

    @Override
    public String toString() {
        return "Student{" +
                "name='" + name + '\'' +
                ", age=" + age +
                '}';
    }
}

public class Test39 {
    public static void main(String[] args) throws NoSuchFieldException {
        Unsafe unsafe = UnsafeAccessor.getUnsafe();
        // 获取类的指定成员变量
        Field name = Student.class.getDeclaredField("name");
        Field age = Student.class.getDeclaredField("age");
        // 获得成员变量的偏移量
        long nameOffset = unsafe.objectFieldOffset(name);
        long ageOffset = unsafe.objectFieldOffset(age);
        // 使用 cas 方法替换成员变量的值
        Student student = new Student();
        unsafe.compareAndSwapObject(student, nameOffset, null, "张三"); // 返回 true
        unsafe.compareAndSwapInt(student, ageOffset, 0, 20); // 返回 true
        System.out.println(student);
    }
}
Student{name='张三', age=20}
第五章 共享模型之工具
5.1、线程池
5.1.1、自定义线程池
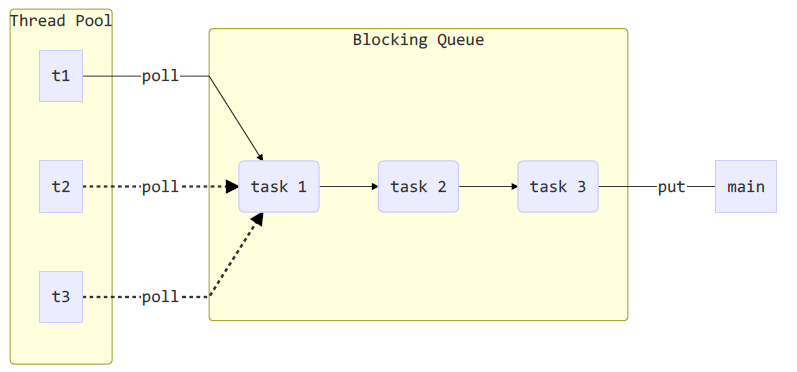
我们接下来将要自己手动设计一个线程池,这个线程池主要由两部分组成:线程池 + 阻塞队列
我们首先来设计一下阻塞队列,作用就是,当线程池容量满了以后,如果主程序 main 还继续增加任务,则会被放到阻塞队列中等待。
// 阻塞队列
@Slf4j
public class BlockingQueue<T> {
    private Deque<T> deque = new ArrayDeque<>();            // 用来存储阻塞的任务
    private ReentrantLock lock = new ReentrantLock();       // 用来对阻塞队列加锁
    private Condition fullWaitSet = lock.newCondition();    // 生产者条件变量
    private Condition emptyWaitSet = lock.newCondition();   // 消费者条件变量
    private int capcity;                                    // 阻塞队列的容量

    // 无参构造函数
    public BlockingQueue() {
        this.capcity = 4;
    }

    // 有参构造函数
    public BlockingQueue(int capcity) {
        this.capcity = capcity;
    }

    // 获取队列大小
    public int size() {
        lock.lock();
        try {
            return deque.size();
        } finally {
            lock.unlock();
        }
    }
}
向阻塞队列中添加任务:
- 如果容量已经满了,那么该任务要阻塞
- 如果容量还有剩余,那么该任务要入队
// 向阻塞队列中添加任务
public boolean put(T task) {
    lock.lock();
    try {
        // 如果容量已经满了,那么该任务要阻塞
        while (deque.size() == capcity) {
            try {
                log.info("等待加入阻塞队列:{}", task);
                fullWaitSet.await();
            } catch (InterruptedException e) {
                e.printStackTrace();
            }
        }
        // 如果容量还有剩余,那么该任务要入队
        log.info("已经加入阻塞队列:{}", task);
        deque.addLast(task);
        emptyWaitSet.signal();
        return true;
    } finally {
        lock.unlock();
    }
}
向阻塞队列中获取任务:
- 如果容量已经空了,那么该请求要阻塞
- 如果容量还有剩余,那么直接返回任务
// 向阻塞队列中获取任务
public T take() {
    lock.lock();
    try {
        // 如果容量已经空了,那么该请求要阻塞
        while (deque.isEmpty()) {
            try {
                emptyWaitSet.await();
            } catch (InterruptedException e) {
                e.printStackTrace();
            }
        }
        // 如果容量还有剩余,那么直接返回任务
        T task = deque.removeFirst();
        fullWaitSet.signal();
        return task;
    } finally {
        lock.unlock();
    }
}
向阻塞队列中添加任务(带超时时间):
- 如果容量已经满了,那么该任务要阻塞
- 如果容量还有剩余,那么该任务要入队
// 向阻塞队列中添加任务(带超时时间)
public boolean offer(T task, Long timeout, TimeUnit timeUnit) {
    lock.lock();
    try {
        long nanos = timeUnit.toNanos(timeout);
        // 如果容量已经满了,那么该任务要阻塞
        while (deque.size() == capcity) {
            try {
                log.info("等待加入阻塞队列:{}", task);
                // awaitNanos的返回值是剩余时间,如果<=0,则表示超时
                if (nanos <= 0) return false;
                nanos = fullWaitSet.awaitNanos(nanos);
            } catch (InterruptedException e) {
                e.printStackTrace();
            }
        }
        // 如果容量还有剩余,那么该任务要入队
        log.info("已经加入阻塞队列:{}", task);
        deque.addLast(task);
        emptyWaitSet.signal();
        return true;
    } finally {
        lock.unlock();
    }
}
向阻塞队列中获取任务(带超时时间):
- 如果容量已经空了,那么该请求要阻塞
- 如果容量还有剩余,那么直接返回任务
// 向阻塞队列中获取任务(带超时时间)
public T poll(Long timeout, TimeUnit timeUnit) {
    lock.lock();
    try {
        long nanos = timeUnit.toNanos(timeout);
        // 如果容量已经空了,那么该请求要阻塞
        while (deque.isEmpty()) {
            try {
                // awaitNanos的返回值是剩余时间,如果<=0,则表示超时
                if (nanos <= 0) return null;
                nanos = emptyWaitSet.awaitNanos(nanos);
            } catch (InterruptedException e) {
                e.printStackTrace();
            }
        }
        // 如果容量还有剩余,那么直接返回任务
        T task = deque.removeFirst();
        fullWaitSet.signal();
        return task;
    } finally {
        lock.unlock();
    }
}
阻塞队列已经设计的可以使用了,接下来我们将要设计线程池。
// 自定义线程池
@Slf4j
public class ThreadPool {
    private int coreSize;                                   // 核心线程数
    private Long timeout;                                   // 超时时间值
    private TimeUnit timeUnit;                              // 时间工具类
    private HashSet<Worker> workers = new HashSet<>();      // 线程集合
    private BlockingQueue<Runnable> taskQueue;              // 阻塞队列

    public ThreadPool(int coreSize, Long timeout, TimeUnit timeUnit, int taskQueueSize) {
        this.coreSize = coreSize;
        this.timeout = timeout;
        this.timeUnit = timeUnit;
        this.taskQueue = new BlockingQueue<>(taskQueueSize);
    }
}
我们需要设计 Worker 工作线程。
// 自定义线程池
@Slf4j
public class ThreadPool {
    private int coreSize;                                   // 核心线程数
    private Long timeout;                                   // 超时时间值
    private TimeUnit timeUnit;                              // 时间工具类
    private HashSet<Worker> workers = new HashSet<>();      // 线程集合
    private BlockingQueue<Runnable> taskQueue;              // 阻塞队列

    public ThreadPool(int coreSize, Long timeout, TimeUnit timeUnit, int taskQueueSize) {
        this.coreSize = coreSize;
        this.timeout = timeout;
        this.timeUnit = timeUnit;
        this.taskQueue = new BlockingQueue<>(taskQueueSize);
    }

    // 工作线程
    class Worker extends Thread {
        private Runnable task;

        public Worker(Runnable task) {
            this.task = task;
        }

        @Override
        public void run() {
            // 运行任务
            while (task != null || (task = taskQueue.poll(timeout, timeUnit)) != null) {
                try {
                    task.run();
                } catch (Exception e) {
                    e.printStackTrace();
                } finally {
                    task = null;
                }
            }
            // 释放线程
            synchronized (workers) {
                log.info("移除线程:{}", this);
                workers.remove(this);
            }
        }
    }

    // 执行任务
    public void execute(Runnable task) {
        // 当任务数没有超过 coreSize 时,直接交给 worker 对象执行
        // 当任务数已经超过 coreSize 时,将 task 加入阻塞队列之中
        synchronized (workers) {
            if (workers.size() < coreSize) {
                Worker worker = new Worker(task);
                log.debug("新增 worker 执行 {}", worker, task);
                workers.add(worker);
                worker.start();
            } else {
                taskQueue.put(task);
            }
        }
    }
}
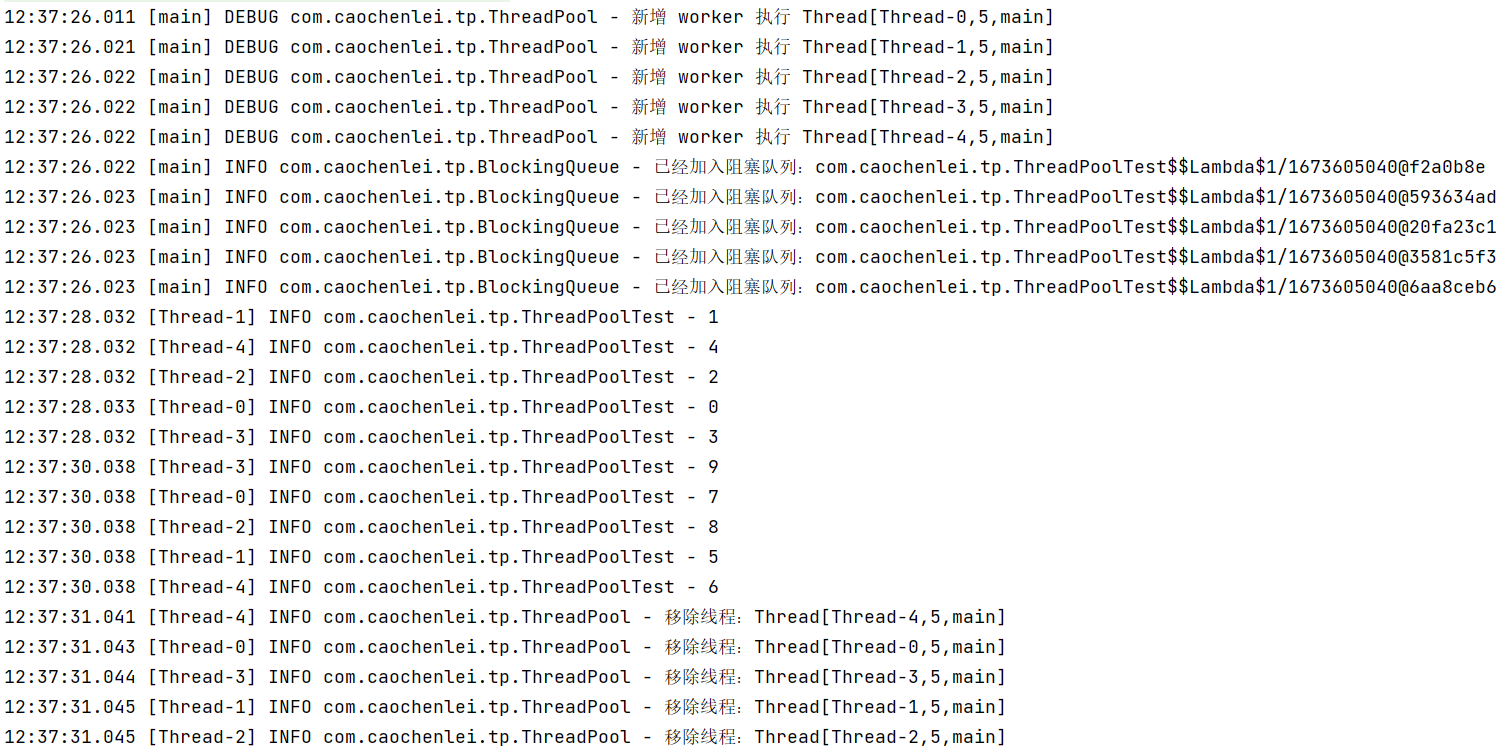
接下来,我们需要对自己设计的自定义线程池进行测试。
@Slf4j
public class ThreadPoolTest {
    public static void main(String[] args) {
        ThreadPool threadPool = new ThreadPool(5, 1000L, TimeUnit.MILLISECONDS, 10);

        for (int i = 0; i < 10; i++) {
            int info = i;
            threadPool.execute(() -> {
                try {
                    Thread.sleep(2000);
                } catch (InterruptedException e) {
                    e.printStackTrace();
                }
                log.info("{}", info);
            });
        }
    }
}
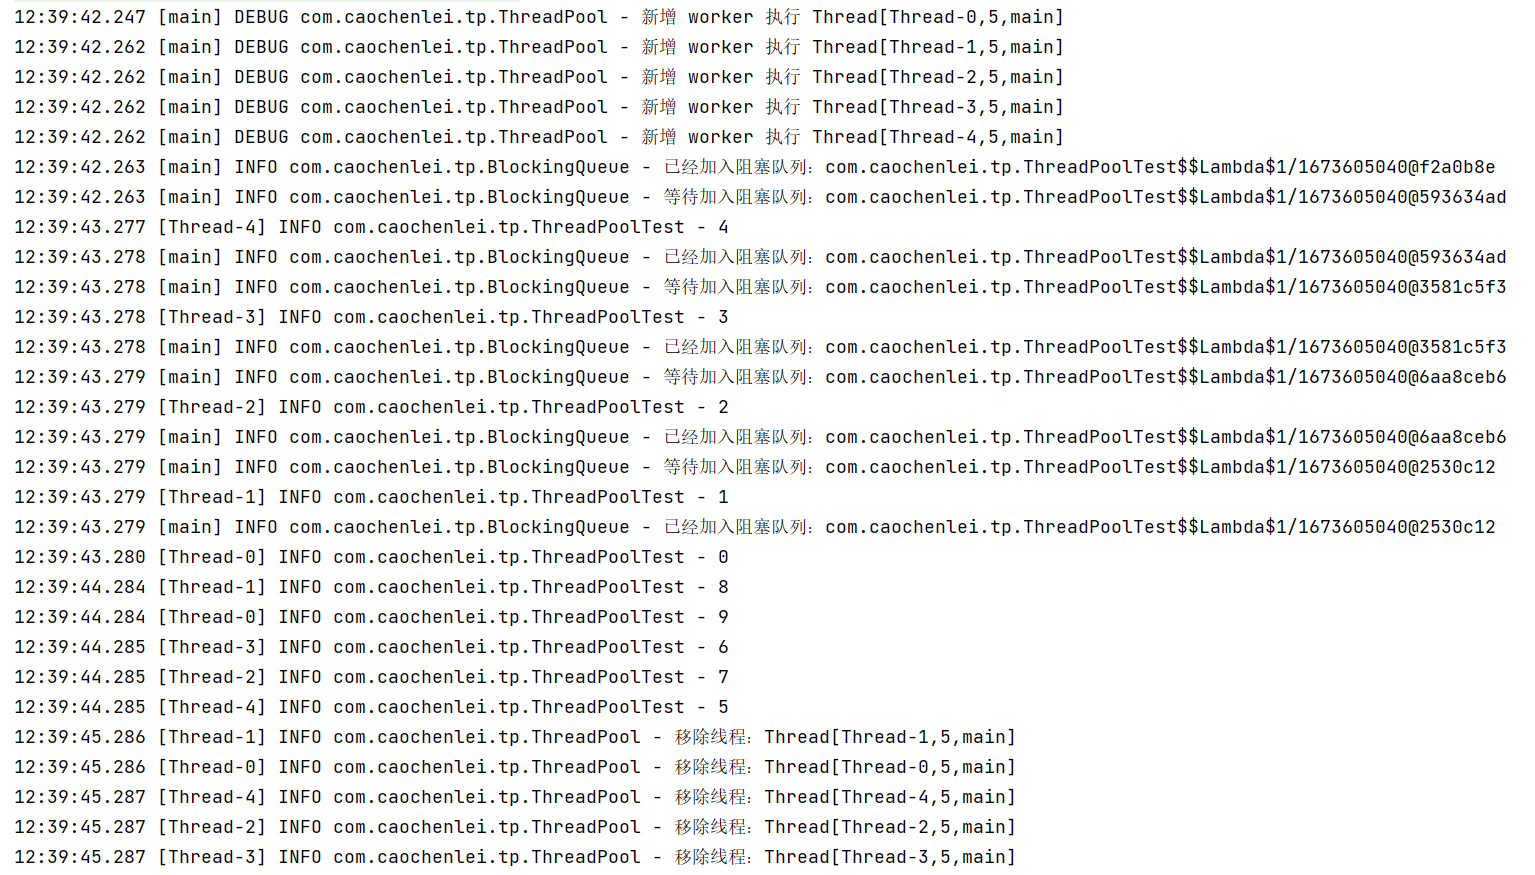
@Slf4j
public class ThreadPoolTest {
    public static void main(String[] args) {
        ThreadPool threadPool = new ThreadPool(5, 1000L, TimeUnit.MILLISECONDS, 1);

        for (int i = 0; i < 10; i++) {
            int info = i;
            threadPool.execute(() -> {
                try {
                    Thread.sleep(1000);
                } catch (InterruptedException e) {
                    e.printStackTrace();
                }
                log.info("{}", info);
            });
        }
    }
}
当任务数已经超过 coreSize 时,将 task 加入阻塞队列之中,一般来说,我们不能一直都等待,一般有以下几种处理方案:
- 死等
- 带超时等待
- 让调用者放弃任务执行
- 让调用者抛出异常
- 让调用者自己执行任务
为了能够支持不同的拒绝策略,我们需要自己设计一个接口:
// 拒绝策略
@FunctionalInterface
interface RejectPolicy<T> {
    void reject(BlockingQueue<T> taskQueue, T task);
}
在 BlockingQueue 中添加一个尝试加入的方法:
public void tryPut(RejectPolicy<T> rejectPolicy, T task) {
    lock.lock();
    try {
        // 判断队列是否满
        if (deque.size() == capcity) {
            rejectPolicy.reject(this, task);
        } else
            // 如果队列有剩余
        {
            log.info("尝试加入阻塞队列:{}", task);
            deque.addLast(task);
            emptyWaitSet.signal();
        }
    } finally {
        lock.unlock();
    }
}
在 ThreadPool 中添加一个拒绝策略的属性:
private RejectPolicy<Runnable> rejectPolicy; // 拒绝策略
在 ThreadPool 中添加一个有参构造的方法:
public ThreadPool(int coreSize, Long timeout, TimeUnit timeUnit, int taskQueueSize, RejectPolicy<Runnable> rejectPolicy) {
    this.coreSize = coreSize;
    this.timeout = timeout;
    this.timeUnit = timeUnit;
    this.taskQueue = new BlockingQueue<>(taskQueueSize);
    this.rejectPolicy = rejectPolicy;
}
在 ThreadPool 中修改执行 execute 方法:
// 执行任务
public void execute(Runnable task) {
    // 当任务数没有超过 coreSize 时,直接交给 worker 对象执行
    // 当任务数已经超过 coreSize 时,将 task 加入阻塞队列之中
    synchronized (workers) {
        if (workers.size() < coreSize) {
            Worker worker = new Worker(task);
            log.debug("新增 worker 执行 {}", worker, task);
            workers.add(worker);
            worker.start();
        } else {
            // taskQueue.put(task);
            taskQueue.tryPut(rejectPolicy, task);
        }
    }
}
紧接着,我们需要对自己设计的自定义线程池进行测试。
@Slf4j
public class ThreadPoolTest {
    public static void main(String[] args) {
        ThreadPool threadPool = new ThreadPool(5, 1000L, TimeUnit.MILLISECONDS, 1, (taskQueue, task) -> {
            // 1. 死等
            taskQueue.put(task);
            // 2) 带超时等待
            // taskQueue.offer(task, 1500L, TimeUnit.MILLISECONDS);
            // 3) 让调用者放弃任务执行
            // log.debug("放弃{}", task);
            // 4) 让调用者抛出异常
            // throw new RuntimeException("任务执行失败 " + task);
            // 5) 让调用者自己执行任务
            // task.run();
        });

        for (int i = 0; i < 10; i++) {
            int info = i;
            threadPool.execute(() -> {
                try {
                    Thread.sleep(3000);
                } catch (InterruptedException e) {
                    e.printStackTrace();
                }
                log.info("{}", info);
            });
        }
    }
}
5.1.2、ThreadPoolExecutor
5.1.2.1、线程池状态
ThreadPoolExecutor 使用 int 的高 3 位来表示线程池状态,低 29 位表示线程数量
| 状态名 | 高3位 | 接收新任务 | 处理阻塞任务队列 | 说明 |
|---|---|---|---|---|
| RUNNING | 111 | Y | Y | 运行状态 |
| SHUTDOWN | 000 | N | Y | 不会接收新任务,但会处理阻塞队列剩余任务 |
| STOP | 001 | N | N | 会中断正在执行的任务,并抛弃阻塞队列任务 |
| TIDYING | 010 | - | - | 任务全执行完毕,活动线程为 0 即将进入终结 |
| TERMINATED | 011 | - | - | 终结状态 |
从数字上比较,TERMINATED > TIDYING > STOP > SHUTDOWN > RUNNING
这些信息存储在一个原子变量 ctl 中,目的是将线程池状态与线程个数合二为一,这样就可以用一次 cas 原子操作进行赋值。
// c 为旧值, ctlOf 返回结果为新值
ctl.compareAndSet(c, ctlOf(targetState, workerCountOf(c))));

// rs 为高 3 位代表线程池状态, wc 为低 29 位代表线程个数,ctl 是合并它们
private static int ctlOf(int rs, int wc) { return rs | wc; }
5.1.2.2、线程池构造
public ThreadPoolExecutor(int corePoolSize,
                              int maximumPoolSize,
                              long keepAliveTime,
                              TimeUnit unit,
                              BlockingQueue<Runnable> workQueue,
                              ThreadFactory threadFactory,
                              RejectedExecutionHandler handler){}
- corePoolSize:核心线程数目 (最多保留的线程数)
- maximumPoolSize:最大线程数目
- keepAliveTime:生存时间 - 针对救急线程
- unit:时间单位 - 针对救急线程
- workQueue:阻塞队列
- threadFactory:线程工厂 - 可以为线程创建时起个好名字
- handler:拒绝策略
线程池中刚开始没有线程,当一个任务提交给线程池后,线程池会创建一个新线程来执行任务。当线程数达到 corePoolSize 并没有线程空闲,这时再加入任务,新加的任务会被加入 workQueue 队列排队,直到有空闲的线程。如果队列选择了有界队列,那么任务超过了队列大小时,会创建 maximumPoolSize - corePoolSize 数目的线程来救急。如果线程到达 maximumPoolSize 仍然有新任务这时会执行拒绝策略。拒绝策略 jdk 提供了 4 种实现,其它著名框架也提供了实现。

- AbortPolicy 让调用者抛出 RejectedExecutionException 异常,这是默认策略
- CallerRunsPolicy 让调用者运行任务
- DiscardOldestPolicy 放弃队列中最早的任务,本任务取而代之
- DiscardPolicy 放弃本次任务
- Dubbo 的实现,在抛出 RejectedExecutionException 异常之前会记录日志,并 dump 线程栈信息,方便定位问题
- Netty 的实现,是创建一个新线程来执行任务
- ActiveMQ 的实现,带超时等待(60s)尝试放入队列,类似我们之前自定义的拒绝策略
- PinPoint 的实现,它使用了一个拒绝策略链,会逐一尝试策略链中每种拒绝策略
高峰过去后,超过 corePoolSize 的救急线程,如果一段时间没有任务做,需要结束节省资源,这个时间由 keepAliveTime 和 unit 控制。
5.1.2.3、线程池工厂方法
根据这个构造方法,JDK Executors 类中提供了众多工厂方法来创建各种用途的线程池。
(1)newFixedThreadPool
public static ExecutorService newFixedThreadPool(int nThreads) {
    return new ThreadPoolExecutor(nThreads, nThreads,
                                  0L, TimeUnit.MILLISECONDS,
                                  new LinkedBlockingQueue<Runnable>());
}
特点:
- 核心线程数 == 最大线程数(没有救急线程被创建),因此也无需超时时间
- 阻塞队列是无界的,可以放任意数量的任务
- 适用于任务量已知,相对耗时的任务
(2)newCachedThreadPool
public static ExecutorService newCachedThreadPool() {
    return new ThreadPoolExecutor(0, Integer.MAX_VALUE,
                                  60L, TimeUnit.SECONDS,
                                  new SynchronousQueue<Runnable>());
}
特点:
- 核心线程数是 0, 最大线程数是 Integer.MAX_VALUE,救急线程的空闲生存时间是 60s,意味着全部都是救急线程(60s 后回收),救急线程可以无限创建
- 救急线程可以无限创建队列采用了 SynchronousQueue 实现特点是,它没有容量,没有线程来取是放不进去的
- 整个线程池表现为线程数会根据任务量不断增长,没有上限,当任务执行完毕,空闲 1分钟后释放线程。 适合任务数比较密集,但每个任务执行时间较短的情况
(3)newSingleThreadExecutor
public static ExecutorService newSingleThreadExecutor() {
    return new FinalizableDelegatedExecutorService
        (new ThreadPoolExecutor(1, 1,
                                0L, TimeUnit.MILLISECONDS,
                                new LinkedBlockingQueue<Runnable>()));
}
特点:
- 希望多个任务排队执行。线程数固定为 1,任务数多于 1 时,会放入无界队列排队。任务执行完毕,这唯一的线程也不会被释放
- 自己创建一个单线程串行执行任务,如果任务执行失败而终止那么没有任何补救措施,而线程池会新建一个线程,保证池的正常工作
注意:
- Executors.newSingleThreadExecutor() 线程个数始终为1,不能修改,FinalizableDelegatedExecutorService 应用的是装饰器模式,只对外暴露了 ExecutorService 接口,因此不能调用 ThreadPoolExecutor 中特有的方法
- Executors.newFixedThreadPool(1) 初始时为1,以后还可以修改,对外暴露的是 ThreadPoolExecutor 对象,可以强转后调用 setCorePoolSize 等方法进行修改
5.1.2.4、线程池提交任务
// 执行任务
public void execute(Runnable command)

// 提交任务,用返回值 Future 获得任务执行结果
public <T> Future<T> submit(Callable<T> task)
public Future<?> submit(Runnable task)
public <T> Future<T> submit(Runnable task, T result)

// 提交 tasks 中所有任务
public <T> List<Future<T>> invokeAll(Collection<? extends Callable<T>> tasks)
// 提交 tasks 中所有任务,带超时时间
public <T> List<Future<T>> invokeAll(Collection<? extends Callable<T>> tasks, long timeout, TimeUnit unit)

// 提交 tasks 中所有任务,哪个任务先成功执行完毕,返回此任务执行结果,其它任务取消
public <T> T invokeAny(Collection<? extends Callable<T>> tasks)
// 提交 tasks 中所有任务,哪个任务先成功执行完毕,返回此任务执行结果,其它任务取消,带超时时间
public <T> T invokeAny(Collection<? extends Callable<T>> tasks, long timeout, TimeUnit unit)
5.1.2.5、线程池关闭方法
// 线程池状态变为 SHUTDOWN,不会接收新任务,但已提交任务会执行完,此方法不会阻塞调用线程的执行
public void shutdown()
// 线程池状态变为 STOP,不会接收新任务,会将队列中的任务返回,并用 interrupt 的方式中断正在执行的任务
public List<Runnable> shutdownNow()
// 不在 RUNNING 状态的线程池,此方法就返回 true
public boolean isShutdown()
// 线程池状态是否是 TERMINATED
public boolean isTerminated()
// 调用 SHUTDOWN 后,由于调用线程并不会等待所有任务运行结束,因此如果它想在线程池 TERMINATED 后做些事情,可利用此方法等待
public boolean awaitTermination(long timeout, TimeUnit unit)
5.1.2.6、任务调度线程池
ScheduledExecutorService pool = Executors.newScheduledThreadPool(2);
pool.schedule(() -> {
    System.out.println("我执行啦1");
}, 1000, TimeUnit.MILLISECONDS);
pool.schedule(() -> {
    System.out.println("我执行啦2");
}, 1000, TimeUnit.MILLISECONDS);
pool.schedule(() -> {
    System.out.println("我执行啦3");
}, 1000, TimeUnit.MILLISECONDS);
pool.schedule(() -> {
    System.out.println("我执行啦4");
}, 1000, TimeUnit.MILLISECONDS);
scheduleAtFixedRate:(延时时间、间隔时间、时间单位),如果执行逻辑时间大于间隔时间,以执行逻辑时间为准。
ScheduledExecutorService pool = Executors.newScheduledThreadPool(2);
pool.scheduleAtFixedRate(() -> {
    try {
        Thread.sleep(2000);
    } catch (InterruptedException e) {
        e.printStackTrace();
    }
    log.info("我执行啦");
}, 1000, 1000, TimeUnit.MILLISECONDS);
16:08:44.178 [pool-1-thread-1] INFO com.caochenlei.Test40 - 我执行啦
16:08:46.200 [pool-1-thread-1] INFO com.caochenlei.Test40 - 我执行啦
16:08:48.207 [pool-1-thread-1] INFO com.caochenlei.Test40 - 我执行啦
16:08:50.215 [pool-1-thread-1] INFO com.caochenlei.Test40 - 我执行啦
16:08:52.221 [pool-1-thread-1] INFO com.caochenlei.Test40 - 我执行啦
scheduleWithFixedDelay:(延时时间、间隔时间、时间单位),如果执行逻辑时间大于间隔时间,以执行逻辑时间 + 间隔时间为准。
ScheduledExecutorService pool = Executors.newScheduledThreadPool(2);
pool.scheduleWithFixedDelay(() -> {
    try {
        Thread.sleep(2000);
    } catch (InterruptedException e) {
        e.printStackTrace();
    }
    log.info("我执行啦");
}, 1000, 1000, TimeUnit.MILLISECONDS);
16:10:34.122 [pool-1-thread-1] INFO com.caochenlei.Test40 - 我执行啦
16:10:37.157 [pool-1-thread-1] INFO com.caochenlei.Test40 - 我执行啦
16:10:40.167 [pool-1-thread-1] INFO com.caochenlei.Test40 - 我执行啦
16:10:43.174 [pool-1-thread-1] INFO com.caochenlei.Test40 - 我执行啦
16:10:46.192 [pool-1-thread-1] INFO com.caochenlei.Test40 - 我执行啦
5.1.3、Fork & Join
Fork/Join 是 JDK 1.7 加入的新的线程池实现,它体现的是一种分治思想,适用于能够进行任务拆分的 cpu 密集型运算。
所谓的任务拆分,是将一个大任务拆分为算法上相同的小任务,直至不能拆分可以直接求解。跟递归相关的一些计算,如归并排序、斐波那契数列、都可以用分治思想进行求解。
Fork/Join 在分治的基础上加入了多线程,可以把每个任务的分解和合并交给不同的线程来完成,进一步提升了运算效率。
Fork/Join 默认会创建与 cpu 核心数大小相同的线程池。
提交给 Fork/Join 线程池的任务需要继承 RecursiveTask(有返回值)或 RecursiveAction(没有返回值)。
例如下面定义了一个对 1~n 之间的整数求和的任务。
@Slf4j
public class MyTask extends RecursiveTask<Integer> {
    int begin;
    int end;

    public MyTask(int begin, int end) {
        this.begin = begin;
        this.end = end;
    }

    @Override
    protected Integer compute() {
        if (begin == end) {
            log.info("join {}", begin);
            return begin;
        }

        int mid = (begin + end) / 2;
        MyTask myTask1 = new MyTask(begin, mid);
        myTask1.fork();
        MyTask myTask2 = new MyTask(mid + 1, end);
        myTask2.fork();

        return myTask1.join() + myTask2.join();
    }
}
public class MyTaskTest {
    public static void main(String[] args) {
        ForkJoinPool pool = new ForkJoinPool(4);
        System.out.println(pool.invoke(new MyTask(1, 10)));
    }
}
21:41:05.165 [ForkJoinPool-1-worker-3] INFO com.caochenlei.fj.MyTask - join 6
21:41:05.165 [ForkJoinPool-1-worker-0] INFO com.caochenlei.fj.MyTask - join 3
21:41:05.165 [ForkJoinPool-1-worker-2] INFO com.caochenlei.fj.MyTask - join 1
21:41:05.165 [ForkJoinPool-1-worker-1] INFO com.caochenlei.fj.MyTask - join 4
21:41:05.174 [ForkJoinPool-1-worker-3] INFO com.caochenlei.fj.MyTask - join 7
21:41:05.174 [ForkJoinPool-1-worker-1] INFO com.caochenlei.fj.MyTask - join 5
21:41:05.174 [ForkJoinPool-1-worker-0] INFO com.caochenlei.fj.MyTask - join 2
21:41:05.174 [ForkJoinPool-1-worker-3] INFO com.caochenlei.fj.MyTask - join 8
21:41:05.174 [ForkJoinPool-1-worker-3] INFO com.caochenlei.fj.MyTask - join 9
21:41:05.174 [ForkJoinPool-1-worker-2] INFO com.caochenlei.fj.MyTask - join 10
55
5.2、JUC
5.2.1、AQS 介绍
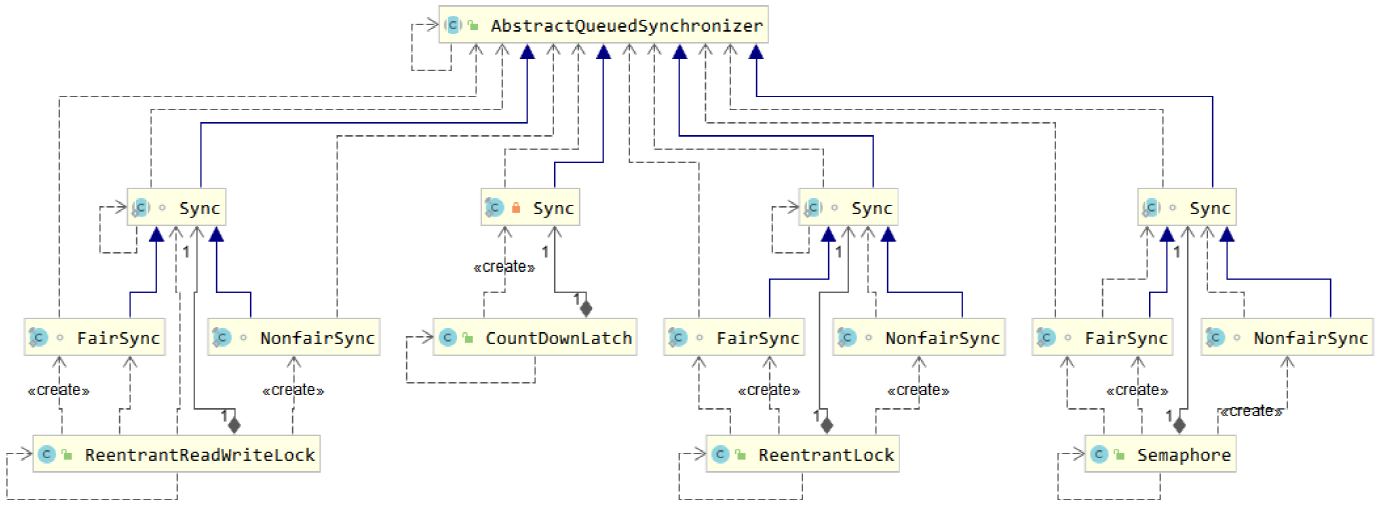
AQS 全称是 AbstractQueuedSynchronizer,是阻塞式锁和相关的同步器工具的框架。
早期程序员会自己通过一种同步器去实现另一种相近的同步器,例如用可重入锁去实现信号量,或反之。这显然不够优雅,于是在 JSR166 中创建了 AQS,提供了这种通用的同步器机制。
AQS 要实现的功能目标:
- 阻塞版本获取锁 acquire 和非阻塞的版本尝试获取锁 tryAcquire
- 获取锁超时机制
- 通过打断取消机制
- 独占机制及共享机制
- 条件不满足时的等待机制
AQS 用 state 属性来表示资源的状态(分独占模式和共享模式,独占模式是只有一个线程能够访问资源,而共享模式可以允许多个线程访问资源),子类需要定义如何维护这个状态,控制如何获取锁和释放锁。
- getState - 获取 state 状态
- setState - 设置 state 状态
- compareAndSetState - cas 机制设置 state 状态
AQS 提供了基于 FIFO 的等待队列,类似于 Monitor 的 EntryList,条件变量来实现等待、唤醒机制,支持多个条件变量,类似于 Monitor 的 WaitSet。
子类主要实现这样一些方法(默认抛出 UnsupportedOperationException)
- tryAcquire
- tryRelease
- tryAcquireShared
- tryReleaseShared
- isHeldExclusively
获取锁的姿势:
// 如果获取锁失败
if (!tryAcquire(arg)) {

}
释放锁的姿势:
// 如果释放锁成功
if (tryRelease(arg)) {

}
为了更好地理解 AQS ,我们准备自己实现一个实现不可重入锁。
实现自定义同步器:MySync
public class MySync extends AbstractQueuedSynchronizer {
    @Override
    protected boolean tryAcquire(int acquires) {
        if (acquires == 1) {
            if (compareAndSetState(0, acquires)) {
                setExclusiveOwnerThread(Thread.currentThread());
                return true;
            }
        }
        return false;
    }

    @Override
    protected boolean tryRelease(int acquires) {
        if (acquires == 1) {
            setExclusiveOwnerThread(null);
            setState(0);
            return true;
        }
        return false;
    }

    @Override
    protected boolean isHeldExclusively() {
        return getState() == 1;
    }

    protected Condition newCondition() {
        return new ConditionObject();
    }
}
自定义锁:MyLock
public class MyLock implements Lock {
    private MySync sync = new MySync();

    @Override//尝试加锁,不成功,进入等待队列
    public void lock() {
        sync.acquire(1);
    }

    @Override//尝试加锁,不成功,进入等待队列,可打断
    public void lockInterruptibly() throws InterruptedException {
        sync.acquireInterruptibly(1);
    }

    @Override//尝试一次,不成功,不进等候队列
    public boolean tryLock() {
        return sync.tryAcquire(1);
    }

    @Override//尝试一次,不成功,不进等候队列,带超时
    public boolean tryLock(long time, TimeUnit unit) throws InterruptedException {
        return sync.tryAcquireNanos(1, unit.toNanos(time));
    }

    @Override//释放锁
    public void unlock() {
        sync.release(1);
    }

    @Override//生成条件变量
    public Condition newCondition() {
        return sync.newCondition();
    }
}
测试类:MyLockTest
@Slf4j
public class MyLockTest {
    public static void main(String[] args) {
        MyLock lock = new MyLock();

        new Thread(() -> {
            lock.lock();
            try {
                log.info("locking...");
                Thread.sleep(2000);
            } catch (Exception e) {
                e.printStackTrace();
            } finally {
                log.info("unlocking...");
                lock.unlock();
            }
        }, "t1").start();

        new Thread(() -> {
            lock.lock();
            try {
                log.info("locking...");
            } catch (Exception e) {
                e.printStackTrace();
            } finally {
                log.info("unlocking...");
                lock.unlock();
            }
        }, "t2").start();
    }
}
10:06:17.497 [t1] INFO com.caochenlei.aqs.MyLockTest - locking...
10:06:19.519 [t1] INFO com.caochenlei.aqs.MyLockTest - unlocking...
10:06:19.519 [t2] INFO com.caochenlei.aqs.MyLockTest - locking...
10:06:19.519 [t2] INFO com.caochenlei.aqs.MyLockTest - unlocking...
5.2.2、ReentrantLock 原理
5.2.2.1、非公平锁原理
先从构造器开始看,默认为非公平锁实现,NonfairSync 继承自 Sync 而 Sync 继承自 AQS。
public ReentrantLock() {
    sync = new NonfairSync();
}
我们接下来来看一下非公平锁的源码:
static final class NonfairSync extends Sync {
    private static final long serialVersionUID = 7316153563782823691L;

    final void lock() {
        if (compareAndSetState(0, 1))
            setExclusiveOwnerThread(Thread.currentThread());
        else
            acquire(1);
    }

    protected final boolean tryAcquire(int acquires) {
        return nonfairTryAcquire(acquires);
    }
}
当加锁的时候,如果没有没有竞争时,直接将state状态修改为1,然后将线程拥有者设置为当前线程。

当有一个线程出现竞争时,执行compareAndSetState(0, 1)将会失败,则会执行acquire(1)。
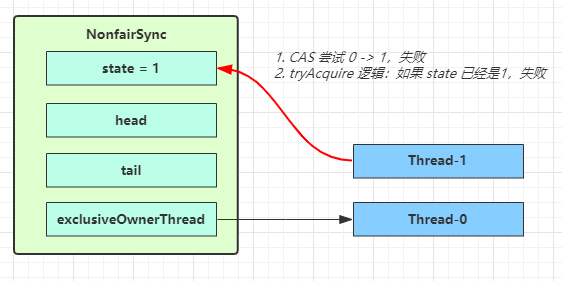
public final void acquire(int arg) {
    if (!tryAcquire(arg) &&
        acquireQueued(addWaiter(Node.EXCLUSIVE), arg))
        selfInterrupt();
}
执行acquire(1),首先会尝试加锁,tryAcquire(arg)此时肯定为false,不能加锁,取反后为true,接下来,我们将会执行第二个判断条件,acquireQueued(addWaiter(Node.EXCLUSIVE), arg)),先执行addWaiter(Node.EXCLUSIVE),接下来进入addWaiter逻辑,构造Node队列。图中黄色三角表示该Node的waitStatus状态,其中0为默认正常状态。Node 的创建是懒惰的,其中第一个Node称为Dummy(哑元 、哨兵、虚拟头节点),用来占位,并不关联线程。
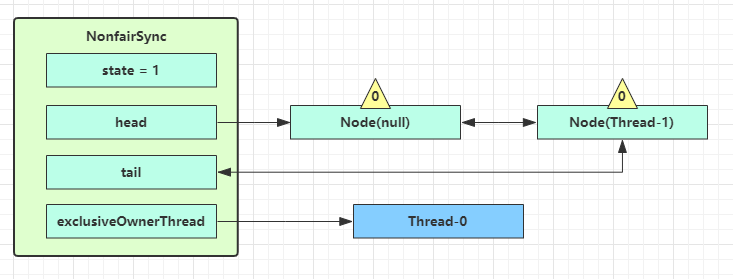
final boolean acquireQueued(final Node node, int arg) {
    boolean failed = true;
    try {
        boolean interrupted = false;
        for (;;) {
            final Node p = node.predecessor();
            if (p == head && tryAcquire(arg)) {
                setHead(node);
                p.next = null; // help GC
                failed = false;
                return interrupted;
            }
            if (shouldParkAfterFailedAcquire(p, node) &&
                parkAndCheckInterrupt())
                interrupted = true;
        }
    } finally {
        if (failed)
            cancelAcquire(node);
    }
}
当前线程进入acquireQueued逻辑:
-
acquireQueued会在一个死循环中不断尝试获得锁,失败后进入park阻塞。 -
如果自己是紧邻着
head(排第二位),那么再次tryAcquire尝试获取锁,当然这时state仍为1,失败。 -
进入
shouldParkAfterFailedAcquire逻辑,将前驱node,即head的waitStatus改为-1,这次返回false。
-
shouldParkAfterFailedAcquire执行完毕回到acquireQueued,再次tryAcquire尝试获取锁,这时state仍为 1,失败。 -
当再次进入
shouldParkAfterFailedAcquire时,这时因为其前驱node的waitStatus已经是-1,这次返回true。 -
进入
parkAndCheckInterrupt,Thread-1park(灰色表示)。
再次有多个线程经历上述过程竞争失败,变成这个样子。

protected final boolean tryRelease(int releases) {
    int c = getState() - releases;
    if (Thread.currentThread() != getExclusiveOwnerThread())
        throw new IllegalMonitorStateException();
    boolean free = false;
    if (c == 0) {
        free = true;
        setExclusiveOwnerThread(null);
    }
    setState(c);
    return free;
}
Thread-0 释放锁,进入 tryRelease 流程,如果成功。
- 设置
exclusiveOwnerThread为null state = 0

当前队列不为 null,并且 head 的 waitStatus = -1,进入 unparkSuccessor 流程。
找到队列中离 head 最近的一个 Node(没取消的),unpark 恢复其运行,本例中即为 Thread-1。
回到 Thread-1 的 acquireQueued 流程。

如果加锁成功(没有竞争),会设置
exclusiveOwnerThread为Thread-1,state = 1head指向刚刚Thread-1所在的Node,该Node清空Thread- 原本的
head因为从链表断开,而可被垃圾回收
如果这时候有其它线程来竞争(非公平的体现),例如这时有 Thread-4 来了。

如果不巧又被 Thread-4 占了先
Thread-4被设置为exclusiveOwnerThread,state = 1Thread-1再次进入acquireQueued流程,获取锁失败,重新进入park阻塞
5.2.2.3、可重入原理
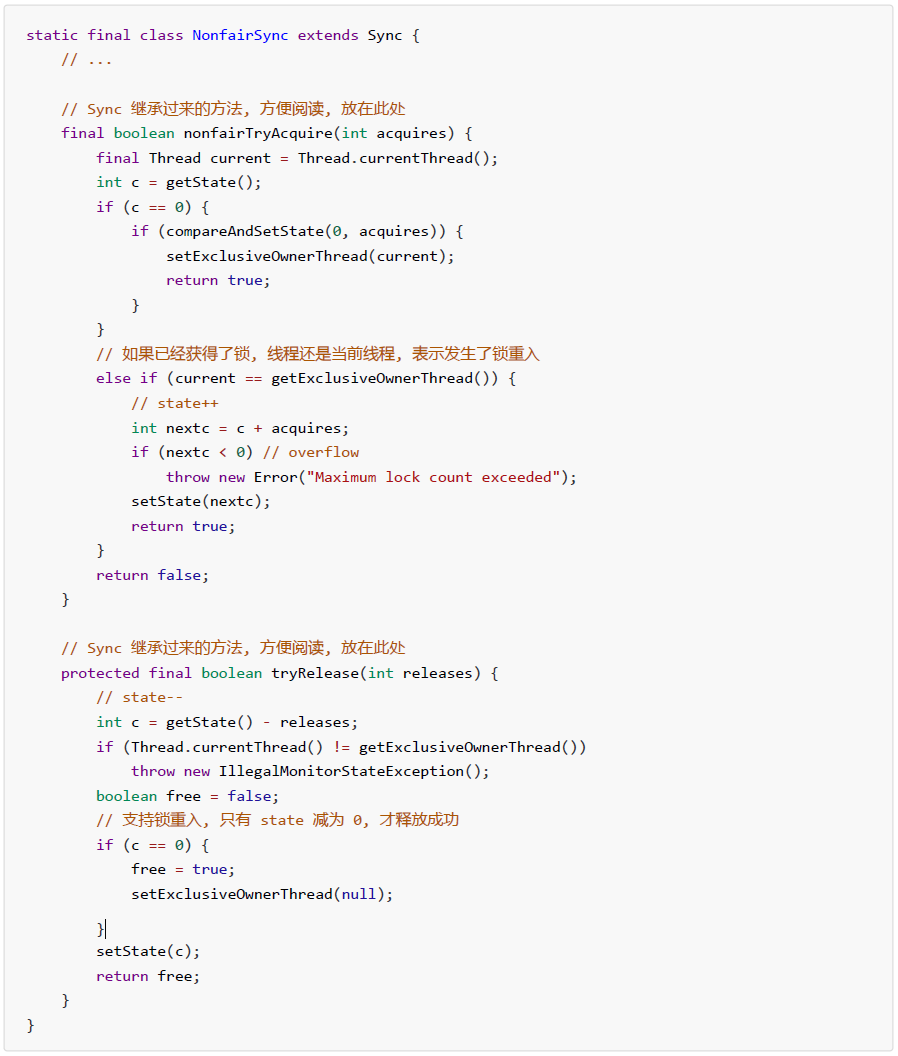
5.2.2.4、可打断原理
不可打断模式 :在此模式下,即使它被打断,仍会驻留在 AQS 队列中,一直要等到获得锁后方能得知自己被打断了。
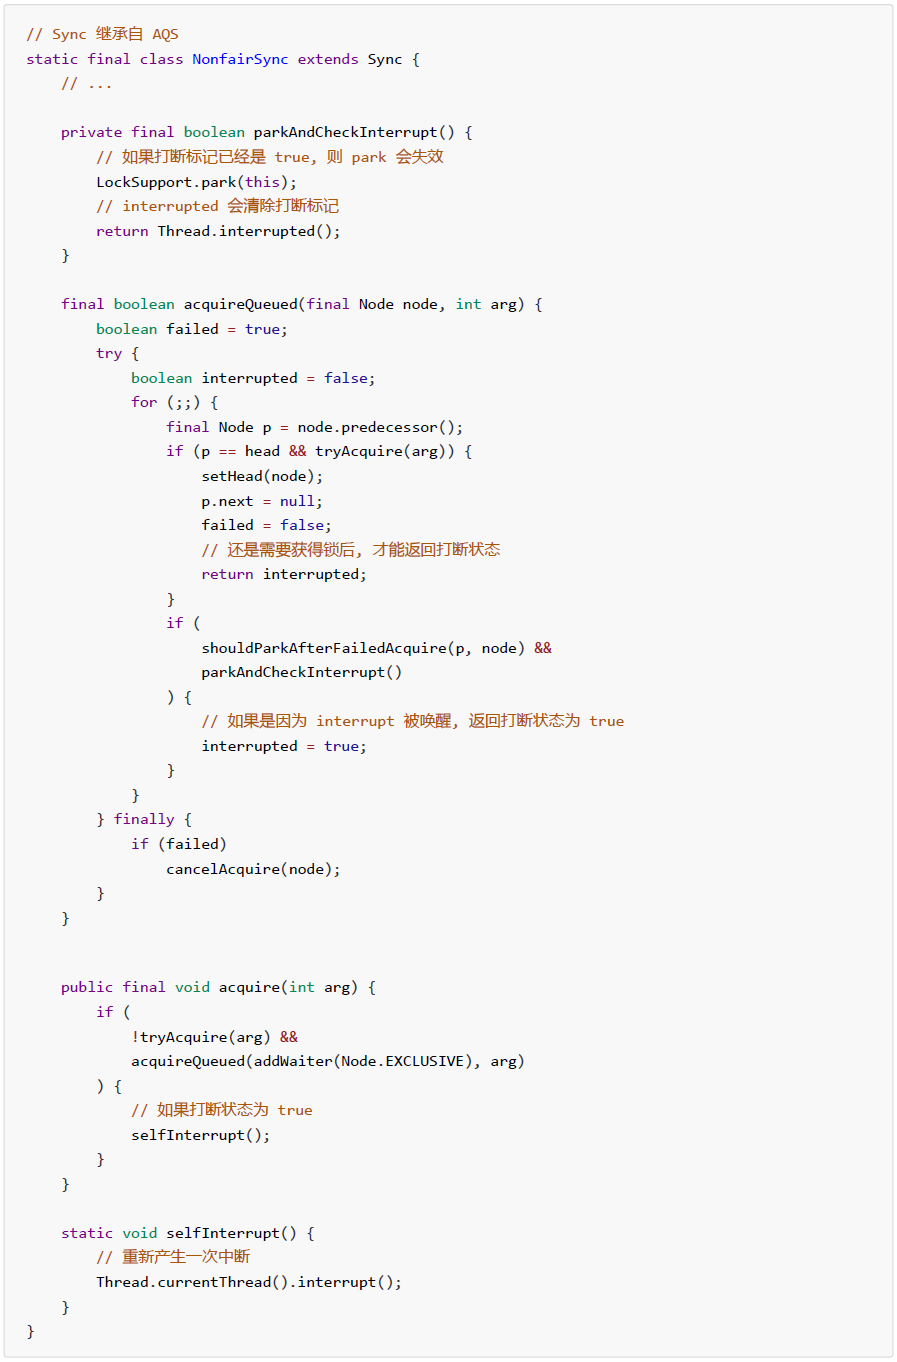
可打断模式

5.2.2.5、公平锁原理
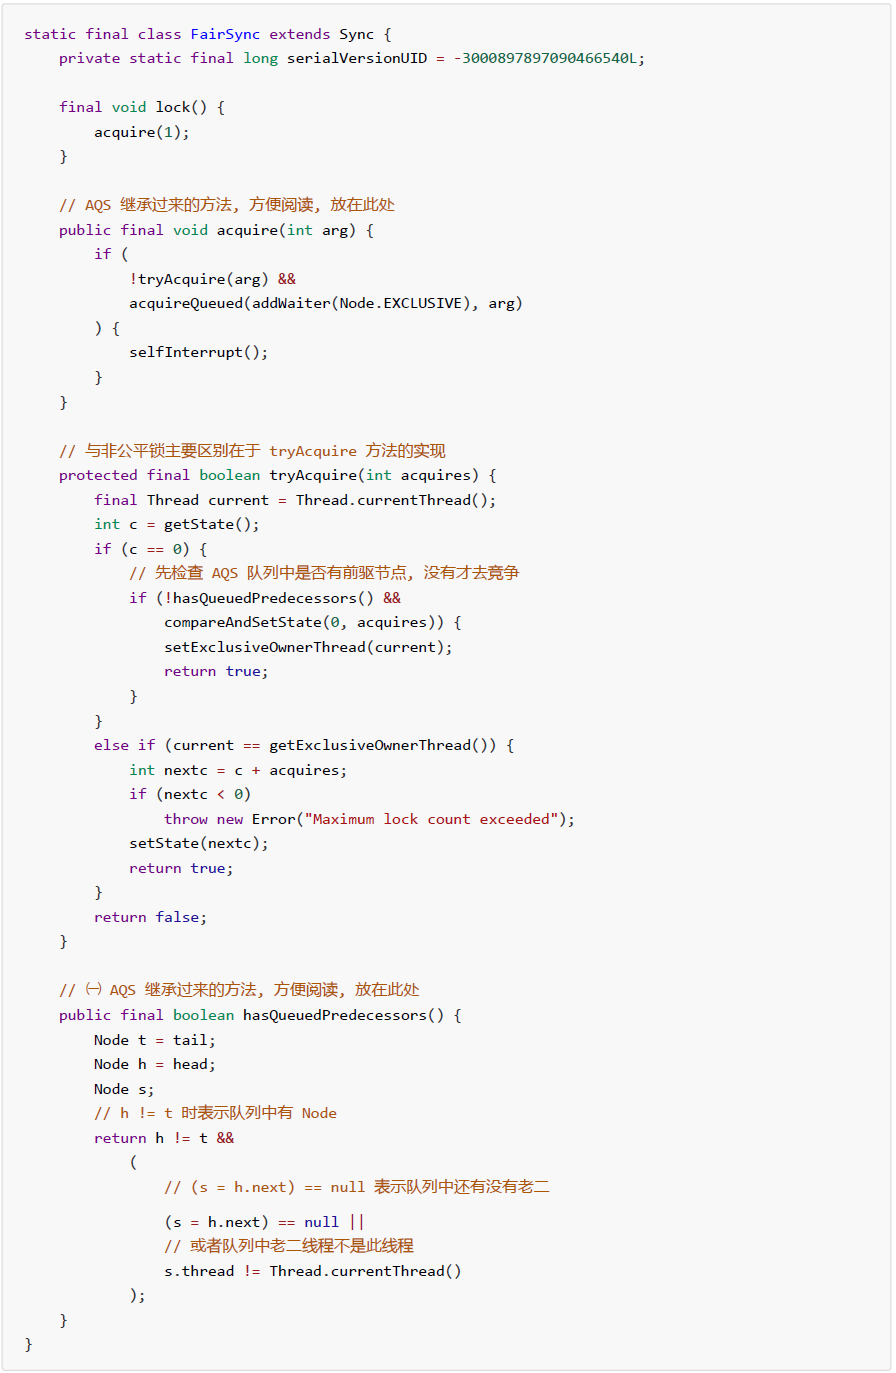
5.2.2.6、条件变量原理
每个条件变量其实就对应着一个等待队列,其实现类是 ConditionObject。
await 流程
开始 Thread-0 持有锁,调用 await,进入 ConditionObject 的 addConditionWaiter 流程。
创建新的 Node 状态为 -2(Node.CONDITION),关联 Thread-0,加入等待队列尾部。
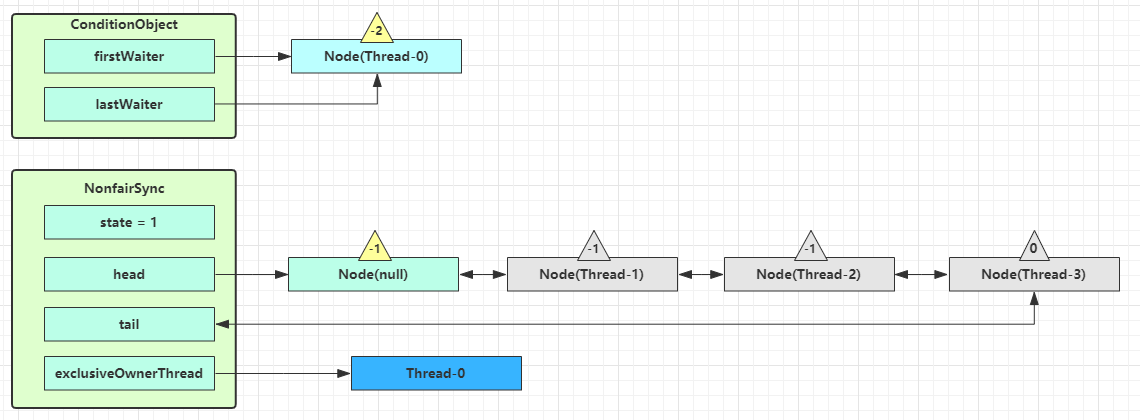
接下来进入 AQS 的 fullyRelease 流程,释放同步器上的锁。

unpark AQS 队列中的下一个节点,竞争锁,假设没有其他竞争线程,那么 Thread-1 竞争成功。
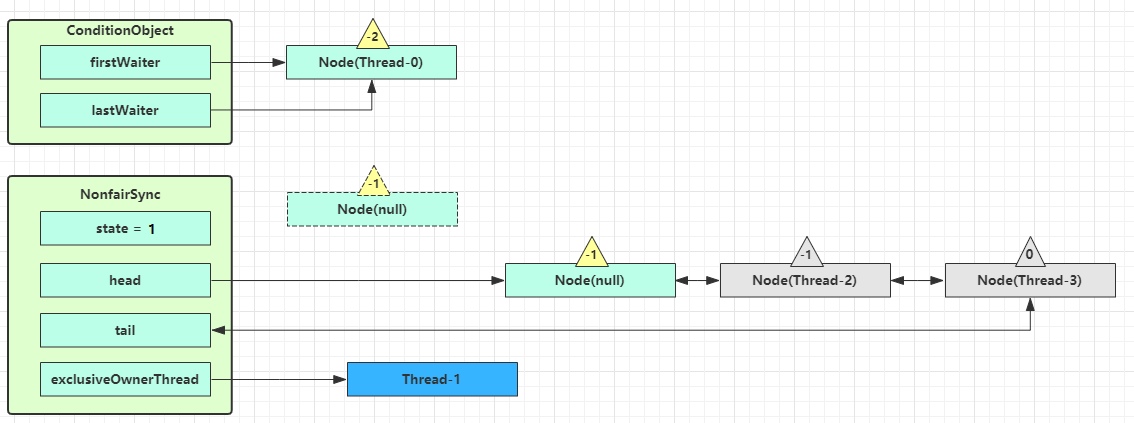
park 阻塞 Thread-0
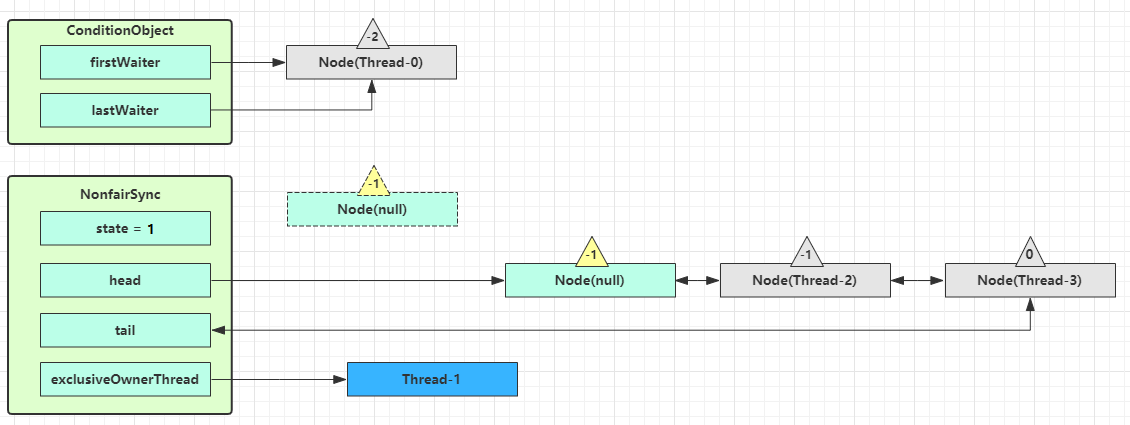
signal 流程
假设 Thread-1 要来唤醒 Thread-0

进入 ConditionObject 的 doSignal 流程,取得等待队列中第一个 Node,即 Thread-0 所在 Node
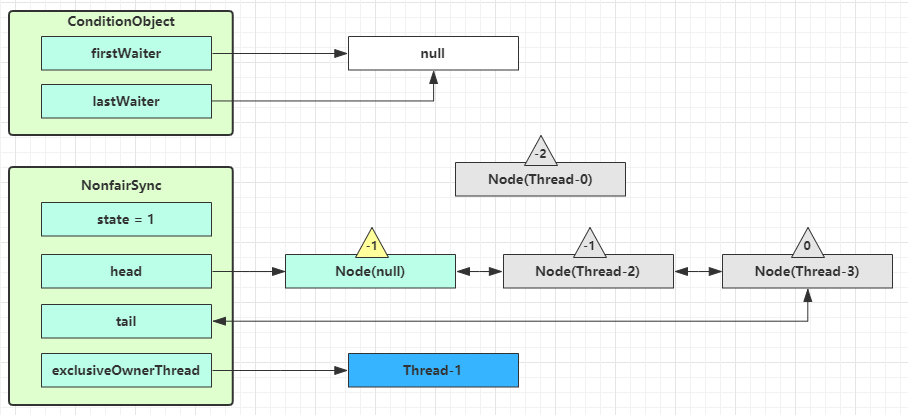
执行 transferForSignal 流程,将该 Node 加入 AQS 队列尾部,将 Thread-0 的 waitStatus 改为 0,Thread-3 的 waitStatus 改为 -1
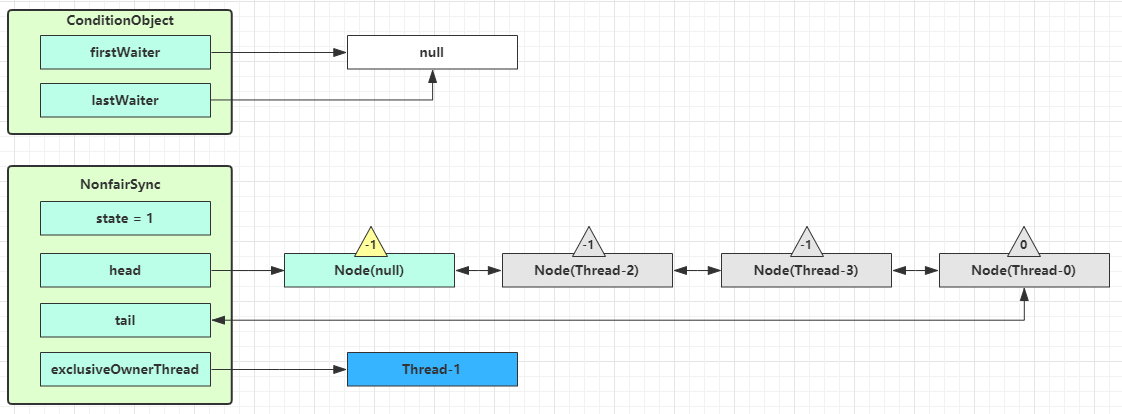
Thread-1 释放锁,进入 unlock 流程,略。
5.2.3、ReentrantReadWriteLock 介绍
当读操作远远高于写操作时,这时候使用 读写锁 让 读-读 可以并发,提高性能。
加解读锁
rw.readLock().lock();
rw.readLock().unlock();
加解写锁
rw.writeLock().lock();
rw.writeLock().unlock();
提供一个 数据容器类 内部分别使用读锁保护数据的 read() 方法,写锁保护数据的 write() 方法。
@Slf4j
public class DataContainer {
    private int data;
    private final ReentrantReadWriteLock rw = new ReentrantReadWriteLock();

    public Object read() throws InterruptedException {
        log.info("获取读锁...");
        rw.readLock().lock();
        try {
            log.info("读取");
            Thread.sleep(2000);
            return data;
        } finally {
            log.info("释放读锁...");
            rw.readLock().unlock();
        }
    }

    public void write(int data) throws InterruptedException {
        log.info("获取写锁...");
        rw.writeLock().lock();
        try {
            log.info("写入");
            this.data = data;
            Thread.sleep(2000);
        } finally {
            log.info("释放写锁...");
            rw.writeLock().unlock();
        }
    }
}
测试读-读:
public class DataContainerTest {
    public static void main(String[] args) {
        DataContainer dataContainer = new DataContainer();
        new Thread(() -> {
            try {
                dataContainer.read();
            } catch (InterruptedException e) {
                e.printStackTrace();
            }
        }, "t1").start();
        new Thread(() -> {
            try {
                dataContainer.read();
            } catch (InterruptedException e) {
                e.printStackTrace();
            }
        }, "t2").start();
    }
}
18:36:55.416 [t1] INFO com.caochenlei.rrw.DataContainer - 获取读锁...
18:36:55.425 [t1] INFO com.caochenlei.rrw.DataContainer - 读取
18:36:55.416 [t2] INFO com.caochenlei.rrw.DataContainer - 获取读锁...
18:36:55.427 [t2] INFO com.caochenlei.rrw.DataContainer - 读取
18:36:57.426 [t1] INFO com.caochenlei.rrw.DataContainer - 释放读锁...
18:36:57.448 [t2] INFO com.caochenlei.rrw.DataContainer - 释放读锁...
测试读-写:
public class DataContainerTest {
    public static void main(String[] args) {
        DataContainer dataContainer = new DataContainer();
        new Thread(() -> {
            try {
                dataContainer.read();
            } catch (InterruptedException e) {
                e.printStackTrace();
            }
        }, "t1").start();
        new Thread(() -> {
            try {
                dataContainer.write(100);
            } catch (InterruptedException e) {
                e.printStackTrace();
            }
        }, "t2").start();
    }
}
18:33:51.731 [t2] INFO com.caochenlei.rrw.DataContainer - 获取写锁...
18:33:51.731 [t1] INFO com.caochenlei.rrw.DataContainer - 获取读锁...
18:33:51.738 [t2] INFO com.caochenlei.rrw.DataContainer - 写入
18:33:53.747 [t2] INFO com.caochenlei.rrw.DataContainer - 释放写锁...
18:33:53.748 [t1] INFO com.caochenlei.rrw.DataContainer - 读取
18:33:55.759 [t1] INFO com.caochenlei.rrw.DataContainer - 释放读锁...
测试写-写:
public class DataContainerTest {
    public static void main(String[] args) {
        DataContainer dataContainer = new DataContainer();
        new Thread(() -> {
            try {
                dataContainer.write(100);
            } catch (InterruptedException e) {
                e.printStackTrace();
            }
        }, "t1").start();
        new Thread(() -> {
            try {
                dataContainer.write(100);
            } catch (InterruptedException e) {
                e.printStackTrace();
            }
        }, "t2").start();
    }
}
18:35:02.095 [t2] INFO com.caochenlei.rrw.DataContainer - 获取写锁...
18:35:02.099 [t1] INFO com.caochenlei.rrw.DataContainer - 获取写锁...
18:35:02.103 [t1] INFO com.caochenlei.rrw.DataContainer - 写入
18:35:04.115 [t1] INFO com.caochenlei.rrw.DataContainer - 释放写锁...
18:35:04.115 [t2] INFO com.caochenlei.rrw.DataContainer - 写入
18:35:06.131 [t2] INFO com.caochenlei.rrw.DataContainer - 释放写锁...
5.2.4、StampedLock 介绍
该类自 JDK 8 加入,是为了进一步优化读性能,它的特点是在使用读锁、写锁时都必须配合【戳】使用。
加解读锁
long stamp = lock.readLock();
lock.unlockRead(stamp);
加解写锁
long stamp = lock.writeLock();
lock.unlockWrite(stamp);
乐观读,StampedLock 支持 tryOptimisticRead() 方法(乐观读),读取完毕后需要做一次 戳校验 如果校验通过,表示这期间确实没有写操作,数据可以安全使用,如果校验没通过,需要重新获取读锁,保证数据安全。
long stamp = lock.tryOptimisticRead();
// 验戳
if(!lock.validate(stamp)) {
    // 锁升级
}
提供一个 数据容器类 内部分别使用读锁保护数据的 read() 方法,写锁保护数据的 write() 方法。
@Slf4j
public class DataContainerStamped {
    private int data;
    private final StampedLock lock = new StampedLock();

    public int read() throws InterruptedException {
        // 乐观锁 - 读锁
        long stamp = lock.tryOptimisticRead();
        log.info("optimistic read locking...{}", stamp);
        Thread.sleep(2000);
        if (lock.validate(stamp)) {
            log.info("read finish...{}, data:{}", stamp, data);
            return data;
        }
        // 锁升级 - 读锁
        log.info("updating to read lock... {}", stamp);
        try {
            stamp = lock.readLock();
            log.info("read lock {}", stamp);
            Thread.sleep(2000);
            log.info("read finish...{}, data:{}", stamp, data);
            return data;
        } finally {
            log.info("read unlock {}", stamp);
            lock.unlockRead(stamp);
        }
    }

    public void write(int data) throws InterruptedException {
        long stamp = lock.writeLock();
        log.info("write lock {}", stamp);
        try {
            Thread.sleep(2000);
            this.data = data;
        } finally {
            log.info("write unlock {}", stamp);
            lock.unlockWrite(stamp);
        }
    }
}
测试读-读:
public class DataContainerStampedTest {
    public static void main(String[] args) {
        DataContainerStamped dataContainer = new DataContainerStamped();
        new Thread(() -> {
            try {
                dataContainer.read();
            } catch (InterruptedException e) {
                e.printStackTrace();
            }
        }, "t1").start();
        new Thread(() -> {
            try {
                dataContainer.read();
            } catch (InterruptedException e) {
                e.printStackTrace();
            }
        }, "t2").start();
    }
}
18:27:06.087 [t1] INFO com.caochenlei.sl.DataContainerStamped - optimistic read locking...256
18:27:06.087 [t2] INFO com.caochenlei.sl.DataContainerStamped - optimistic read locking...256
18:27:08.105 [t2] INFO com.caochenlei.sl.DataContainerStamped - read finish...256, data:0
18:27:08.105 [t1] INFO com.caochenlei.sl.DataContainerStamped - read finish...256, data:0
测试读-写:
public class DataContainerStampedTest {
    public static void main(String[] args) {
        DataContainerStamped dataContainer = new DataContainerStamped();
        new Thread(() -> {
            try {
                dataContainer.read();
            } catch (InterruptedException e) {
                e.printStackTrace();
            }
        }, "t1").start();
        new Thread(() -> {
            try {
                dataContainer.write(100);
            } catch (InterruptedException e) {
                e.printStackTrace();
            }
        }, "t2").start();
    }
}
18:28:59.424 [t2] INFO com.caochenlei.sl.DataContainerStamped - write lock 384
18:28:59.424 [t1] INFO com.caochenlei.sl.DataContainerStamped - optimistic read locking...256
18:29:01.445 [t2] INFO com.caochenlei.sl.DataContainerStamped - write unlock 384
18:29:01.445 [t1] INFO com.caochenlei.sl.DataContainerStamped - updating to read lock... 256
18:29:01.446 [t1] INFO com.caochenlei.sl.DataContainerStamped - read lock 513
18:29:03.454 [t1] INFO com.caochenlei.sl.DataContainerStamped - read finish...513, data:100
18:29:03.455 [t1] INFO com.caochenlei.sl.DataContainerStamped - read unlock 513
测试写-写:
public class DataContainerStampedTest {
    public static void main(String[] args) {
        DataContainerStamped dataContainer = new DataContainerStamped();
        new Thread(() -> {
            try {
                dataContainer.write(100);
            } catch (InterruptedException e) {
                e.printStackTrace();
            }
        }, "t1").start();
        new Thread(() -> {
            try {
                dataContainer.write(100);
            } catch (InterruptedException e) {
                e.printStackTrace();
            }
        }, "t2").start();
    }
}
18:29:48.046 [t1] INFO com.caochenlei.sl.DataContainerStamped - write lock 384
18:29:50.072 [t1] INFO com.caochenlei.sl.DataContainerStamped - write unlock 384
18:29:50.072 [t2] INFO com.caochenlei.sl.DataContainerStamped - write lock 640
18:29:52.086 [t2] INFO com.caochenlei.sl.DataContainerStamped - write unlock 640
5.2.5、Semaphore 介绍
Semaphore信号量,用来限制能同时访问共享资源的线程上限。
场景:我们现在有6个线程,但是我们每次要求只有2个线程运行,这时候可以使用信号量,来限制能同时访问共享资源的线程上限。
Semaphore semaphore = new Semaphore(2);
for (int i = 0; i < 6; i++) {
    new Thread(() -> {
        try {
            semaphore.acquire();
            log.debug("running...");
            Thread.sleep(2000);
            log.debug("end...");
        } catch (InterruptedException e) {
            e.printStackTrace();
        } finally {
            semaphore.release();
        }
    }).start();
}
15:54:30.286 [Thread-1] DEBUG com.caochenlei.Test41 - running...
15:54:30.286 [Thread-0] DEBUG com.caochenlei.Test41 - running...
15:54:32.301 [Thread-1] DEBUG com.caochenlei.Test41 - end...
15:54:32.301 [Thread-0] DEBUG com.caochenlei.Test41 - end...
15:54:32.301 [Thread-2] DEBUG com.caochenlei.Test41 - running...
15:54:32.301 [Thread-3] DEBUG com.caochenlei.Test41 - running...
15:54:34.317 [Thread-3] DEBUG com.caochenlei.Test41 - end...
15:54:34.317 [Thread-2] DEBUG com.caochenlei.Test41 - end...
15:54:34.317 [Thread-4] DEBUG com.caochenlei.Test41 - running...
15:54:34.317 [Thread-5] DEBUG com.caochenlei.Test41 - running...
15:54:36.332 [Thread-5] DEBUG com.caochenlei.Test41 - end...
15:54:36.332 [Thread-4] DEBUG com.caochenlei.Test41 - end...
5.2.5、CountDownLatch 介绍
CountdownLatch用来进行线程同步协作,等待所有线程完成倒计时。
其中构造参数用来初始化等待计数值,await() 用来等待计数归零,countDown() 用来让计数减一。
CountDownLatch latch = new CountDownLatch(3);
new Thread(() -> {
    try {
        log.debug("begin...");
        Thread.sleep(1000);
        latch.countDown();
        log.debug("end...{}", latch.getCount());
    } catch (InterruptedException e) {
        e.printStackTrace();
    }
}).start();
new Thread(() -> {
    try {
        log.debug("begin...");
        Thread.sleep(2000);
        latch.countDown();
        log.debug("end...{}", latch.getCount());
    } catch (InterruptedException e) {
        e.printStackTrace();
    }
}).start();
new Thread(() -> {
    try {
        log.debug("begin...");
        Thread.sleep(3000);
        latch.countDown();
        log.debug("end...{}", latch.getCount());
    } catch (InterruptedException e) {
        e.printStackTrace();
    }
}).start();
log.debug("waiting...");
latch.await();
log.debug("wait end...");
16:30:00.046 [main] DEBUG com.caochenlei.Test42 - waiting...
16:30:00.064 [Thread-0] DEBUG com.caochenlei.Test42 - begin...
16:30:00.064 [Thread-1] DEBUG com.caochenlei.Test42 - begin...
16:30:00.066 [Thread-2] DEBUG com.caochenlei.Test42 - begin...
16:30:01.066 [Thread-0] DEBUG com.caochenlei.Test42 - end...2
16:30:02.074 [Thread-1] DEBUG com.caochenlei.Test42 - end...1
16:30:03.080 [Thread-2] DEBUG com.caochenlei.Test42 - end...0
16:30:03.080 [main] DEBUG com.caochenlei.Test42 - wait end...
5.2.6、CyclicBarrier 介绍
CyclicBarrier循环栅栏,用来进行线程同步协作,等待线程满足某个计数。
构造时设置『计数个数』,每个线程执行到某个需要“同步”的时刻调用 await() 方法进行等待,当等待的线程数满足『计数个数』时,继续执行。他可以用于多线程计算数据,最后合并计算结果的场景。CountDownLatch 是一次性的,CyclicBarrier 是可循环利用的。
ExecutorService service = Executors.newFixedThreadPool(2);
CyclicBarrier barrier = new CyclicBarrier(2, () -> {
    log.debug("task1, task2 finish...");
});
for (int i = 0; i < 4; i++) {
    service.submit(() -> {
        log.debug("task1 begin...");
        try {
            Thread.sleep(1000);
            barrier.await(); // 2-1=1
        } catch (InterruptedException | BrokenBarrierException e) {
            e.printStackTrace();
        }
    });
    service.submit(() -> {
        log.debug("task2 begin...");
        try {
            Thread.sleep(2000);
            barrier.await(); // 1-1=0
        } catch (InterruptedException | BrokenBarrierException e) {
            e.printStackTrace();
        }
    });
}
service.shutdown();
16:55:45.871 [pool-1-thread-2] DEBUG com.caochenlei.Test43 - task2 begin...
16:55:45.871 [pool-1-thread-1] DEBUG com.caochenlei.Test43 - task1 begin...
16:55:47.882 [pool-1-thread-2] DEBUG com.caochenlei.Test43 - task1, task2 finish...
16:55:47.882 [pool-1-thread-2] DEBUG com.caochenlei.Test43 - task1 begin...
16:55:47.882 [pool-1-thread-1] DEBUG com.caochenlei.Test43 - task2 begin...
16:55:49.888 [pool-1-thread-1] DEBUG com.caochenlei.Test43 - task1, task2 finish...
16:55:49.888 [pool-1-thread-1] DEBUG com.caochenlei.Test43 - task1 begin...
16:55:49.889 [pool-1-thread-2] DEBUG com.caochenlei.Test43 - task2 begin...
16:55:51.900 [pool-1-thread-2] DEBUG com.caochenlei.Test43 - task1, task2 finish...
16:55:51.901 [pool-1-thread-2] DEBUG com.caochenlei.Test43 - task1 begin...
16:55:51.901 [pool-1-thread-1] DEBUG com.caochenlei.Test43 - task2 begin...
16:55:53.903 [pool-1-thread-1] DEBUG com.caochenlei.Test43 - task1, task2 finish...
所属网站分类: 技术文章 > 博客
作者:模糊不清牛肉面
链接:http://www.phpheidong.com/blog/article/89637/40aa9a0efb51e0628693/
来源:php黑洞网
任何形式的转载都请注明出处,如有侵权 一经发现 必将追究其法律责任
昵称:
评论内容:(最多支持255个字符)
---无人问津也好,技不如人也罢,你都要试着安静下来,去做自己该做的事,而不是让内心的烦躁、焦虑,坏掉你本来就不多的热情和定力